How to Embed a Video in PowerPoint - Step by Step Guide

Adding videos to PowerPoint can instantly elevate your presentation, making it more engaging, easier to understand, and memorable for your audience. Whether you’re showing a product in action, sharing a customer testimonial, or breaking down complex topics, videos make your message clearer and more exciting.
We'll guide you through several methods for embedding videos in PowerPoint, from traditional approaches like using YouTube links and local video files. We'll cover the pros and cons of each method, along with helpful tips. Finally, we'll introduce Clipara—an alternative that offers customised, brand-friendly video embeds.
Why Add Videos to Your PowerPoint Presentation?
Adding videos to your slides is like adding a boost of energy to your presentation. Here’s why it works:
- Keeps People Interested
- Let’s face it—long blocks of text can get boring fast. A video grabs attention and keeps people tuned in, so they’re more likely to remember what you’re saying.
- Explains Things Clearly
- Some concepts are just easier to show than explain. Whether it’s a demo or a quick walkthrough, videos make complicated stuff feel simple by giving people a visual way to follow along.
- Helps People Remember
- People remember videos more than plain text. By adding videos, you’re giving your audience something they’re more likely to recall later on.
- Makes You Look Professional
- A well-placed video can make your presentation feel more polished. Imagine a quick customer testimonial or a product demo—it adds instant credibility.
- Suits Different Learning Styles
- Some people learn by seeing, others by hearing, and some by doing. Videos appeal to all types, so they help you reach everyone in the room.
- Creates an Emotional Connection
- Videos show emotion better than words on a screen. If you want your audience to feel inspired, excited, or connected, videos can do the trick.
Adding videos isn’t just about filling space—it’s a way to make your message clearer, more memorable, and way more engaging.
Quick Overview: Ways to Embed Videos in PowerPoint
- Uploading a video from your computer
- Embedding online videos
- Using Clipara for customisable, branded video content
Let’s dive into each of these options.
Method 1: Uploading a Video from Your Computer
This is the most straightforward way to add a video to PowerPoint. By uploading a video file directly from your computer, you avoid relying on an internet connection. Just keep in mind that adding large video files can make your PowerPoint file size much larger.
Steps:
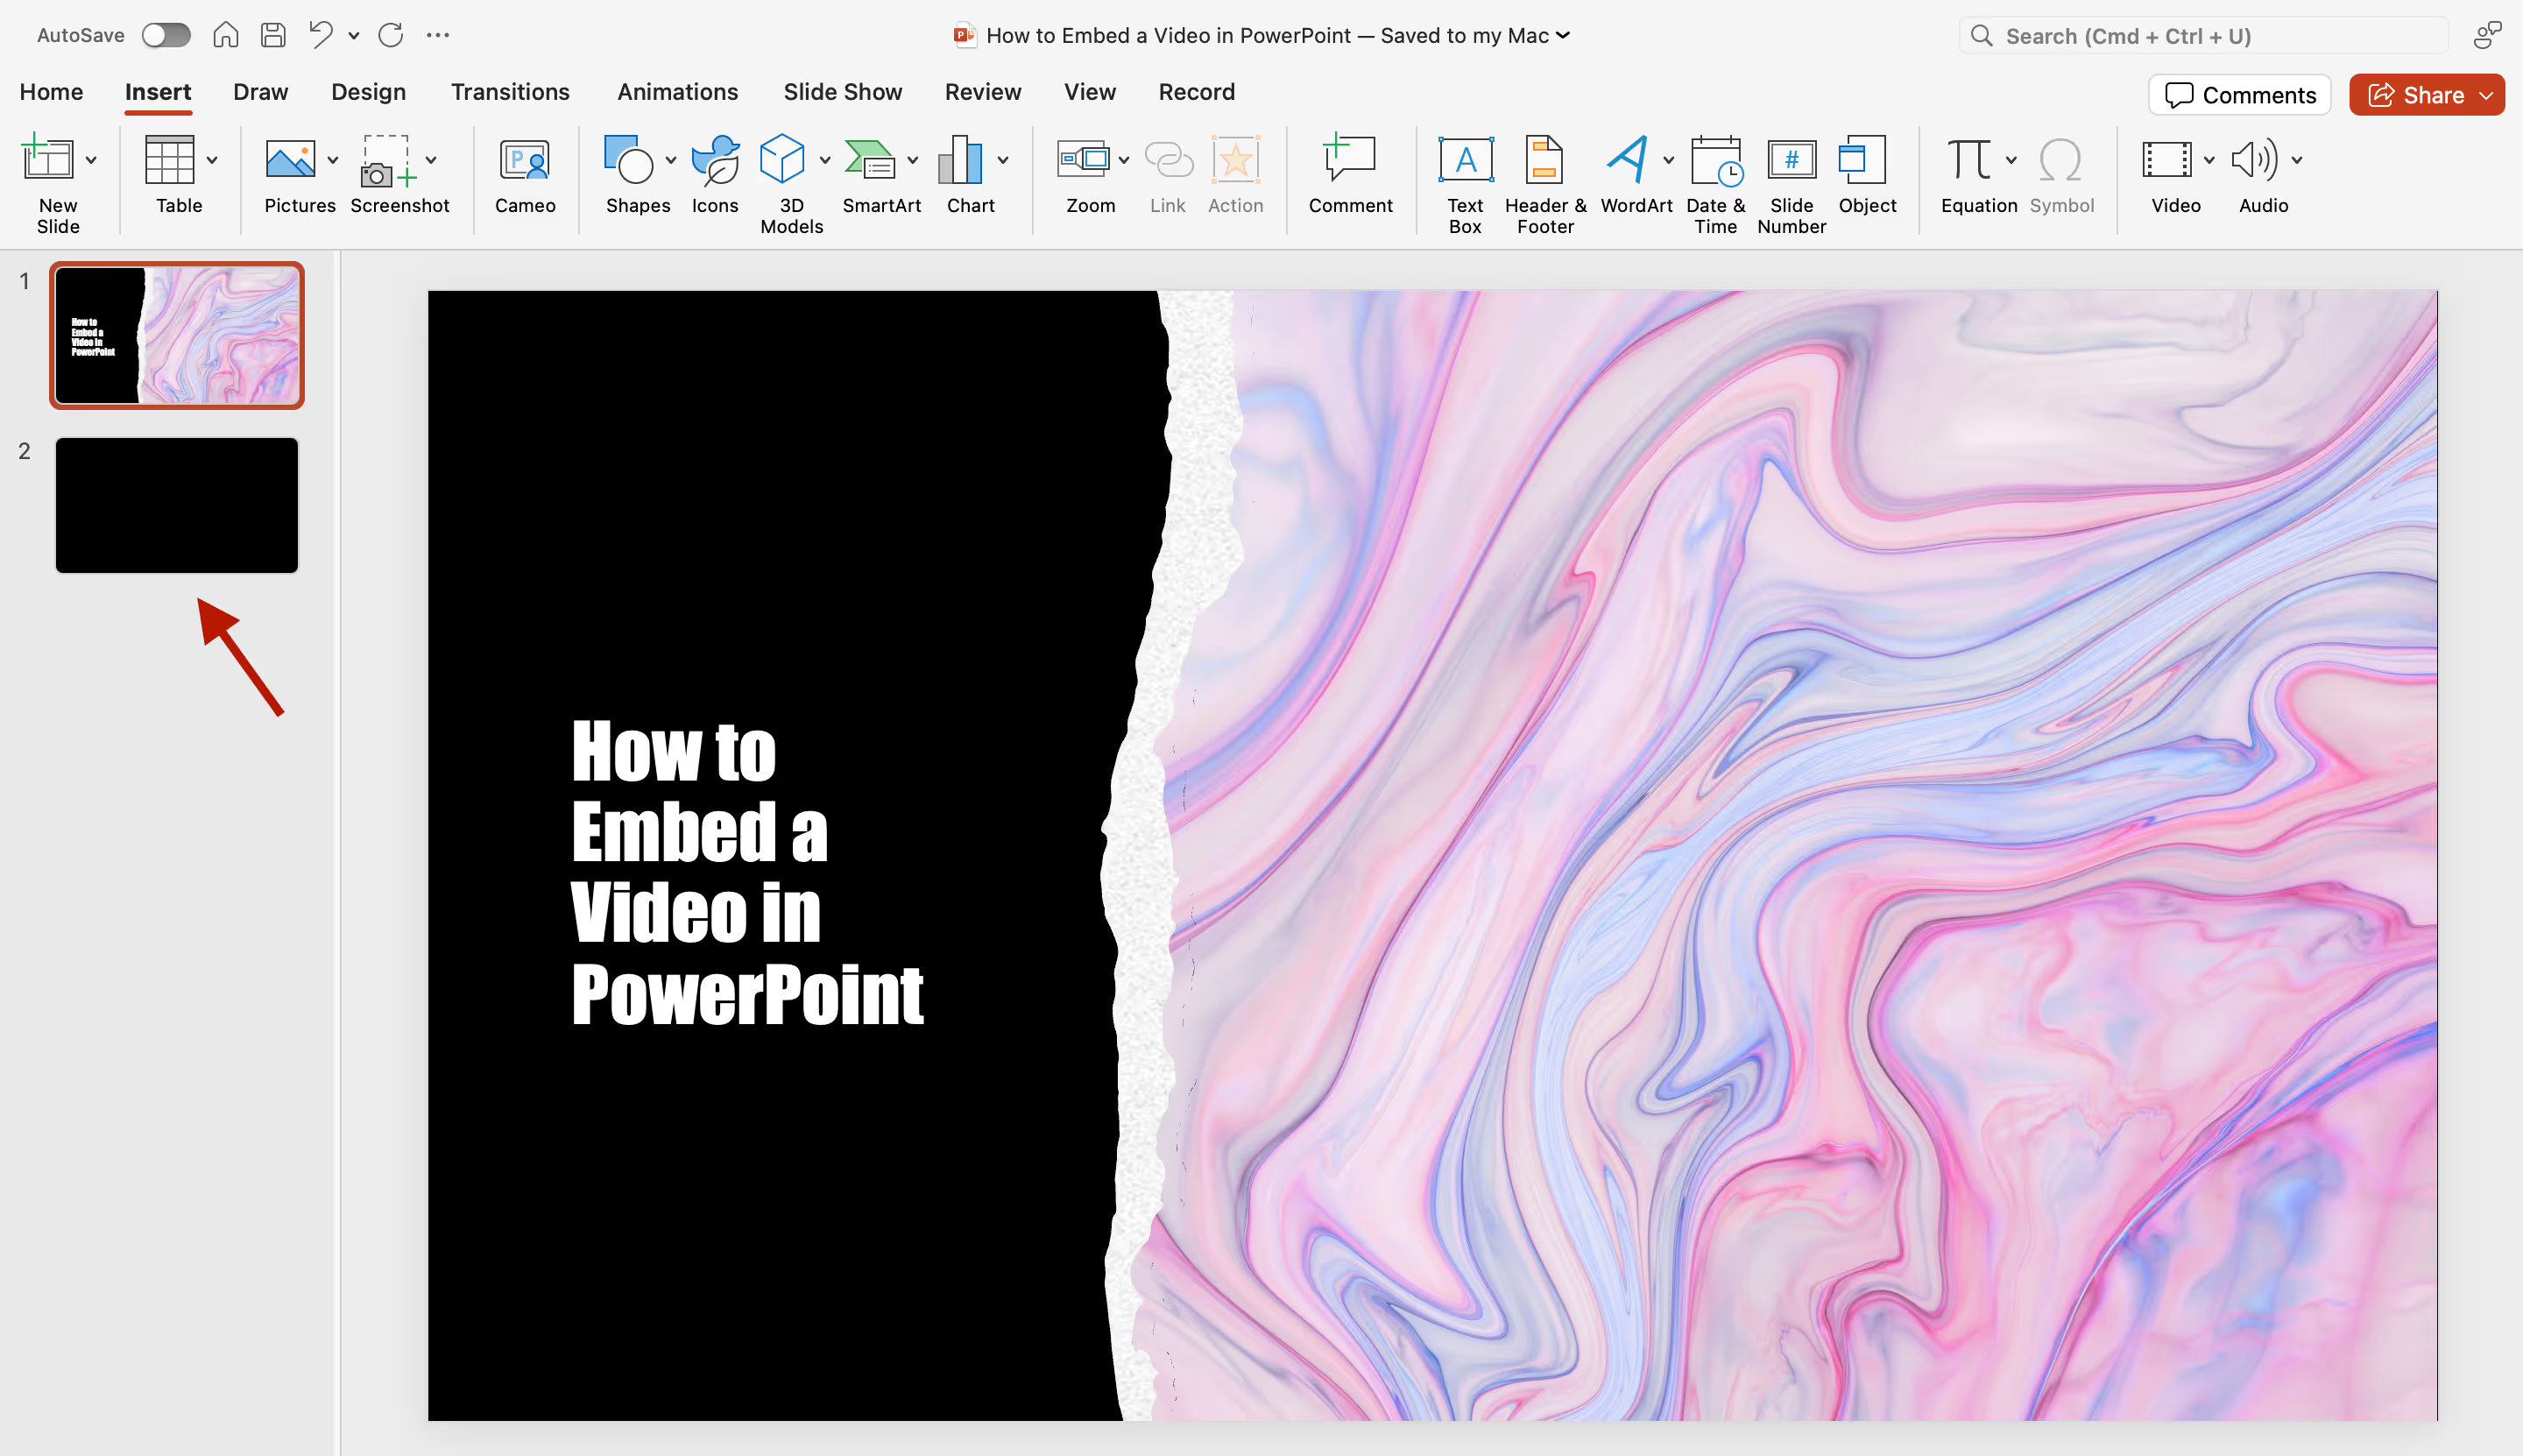
1. Select Slide - Open the PowerPoint presentation and navigate to the slide where you want to add the video.
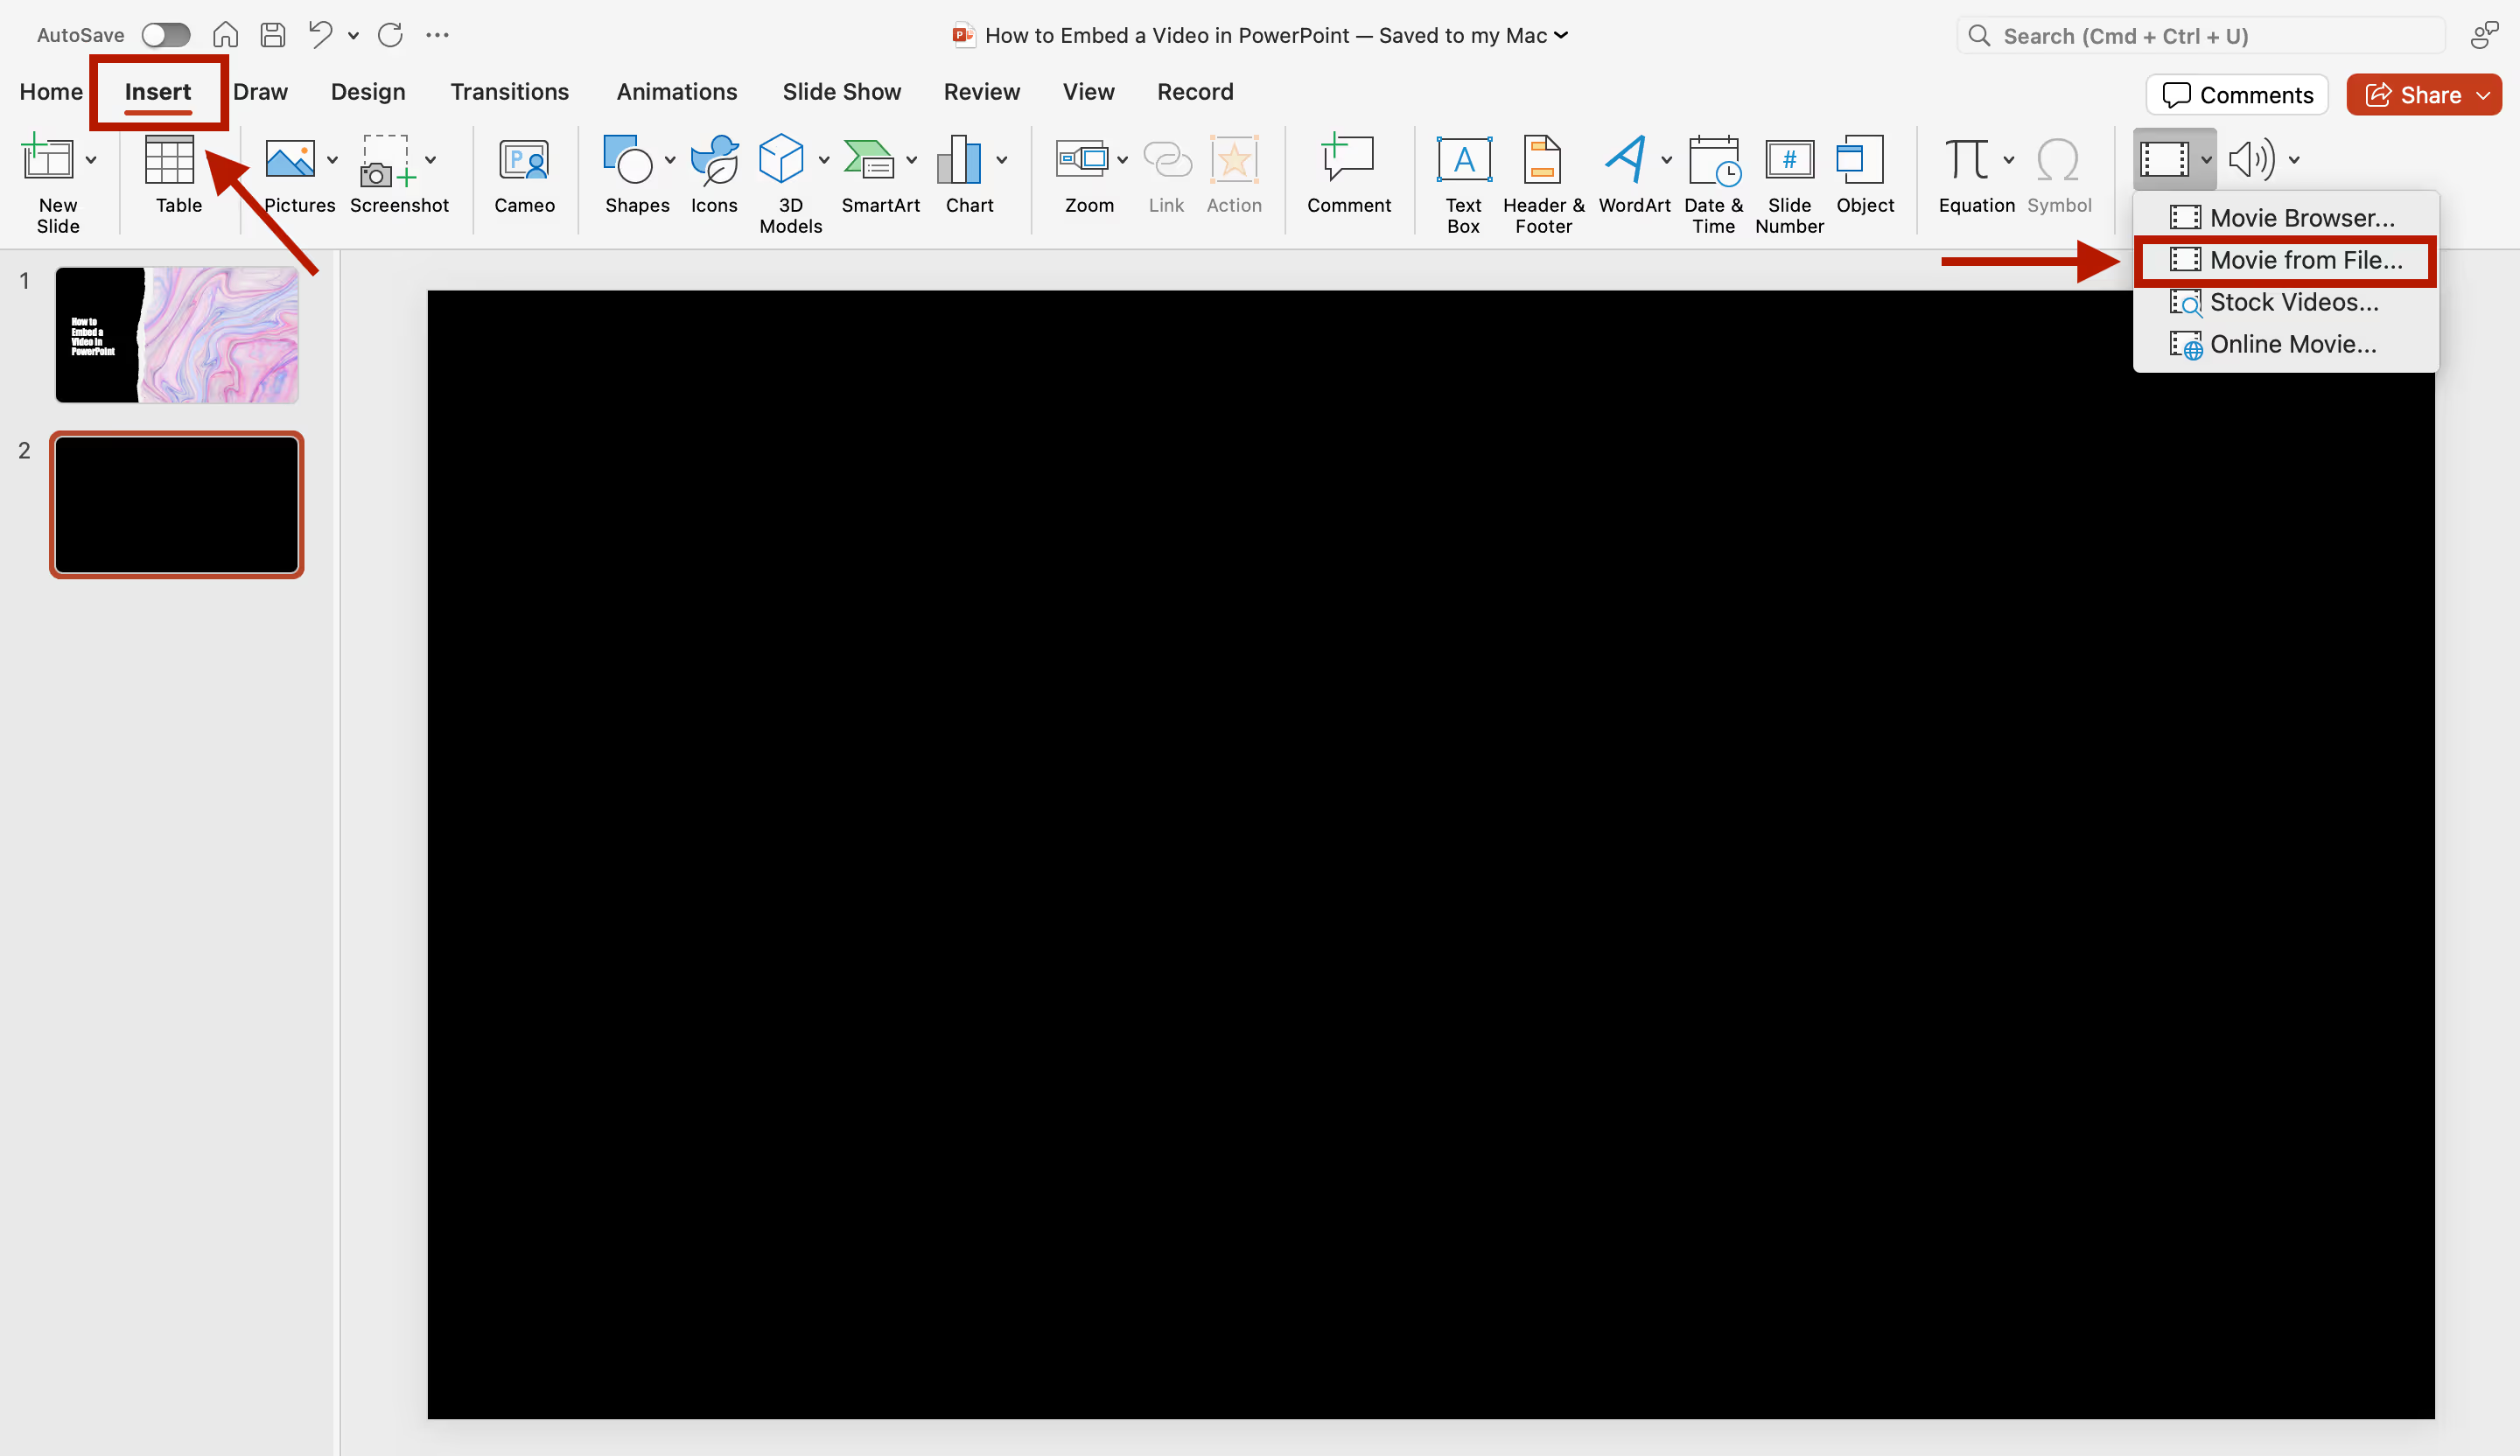
2. Insert Video - Go to the Insert tab, select Video > Movie from File (or Video from PC or This Device on Windows).
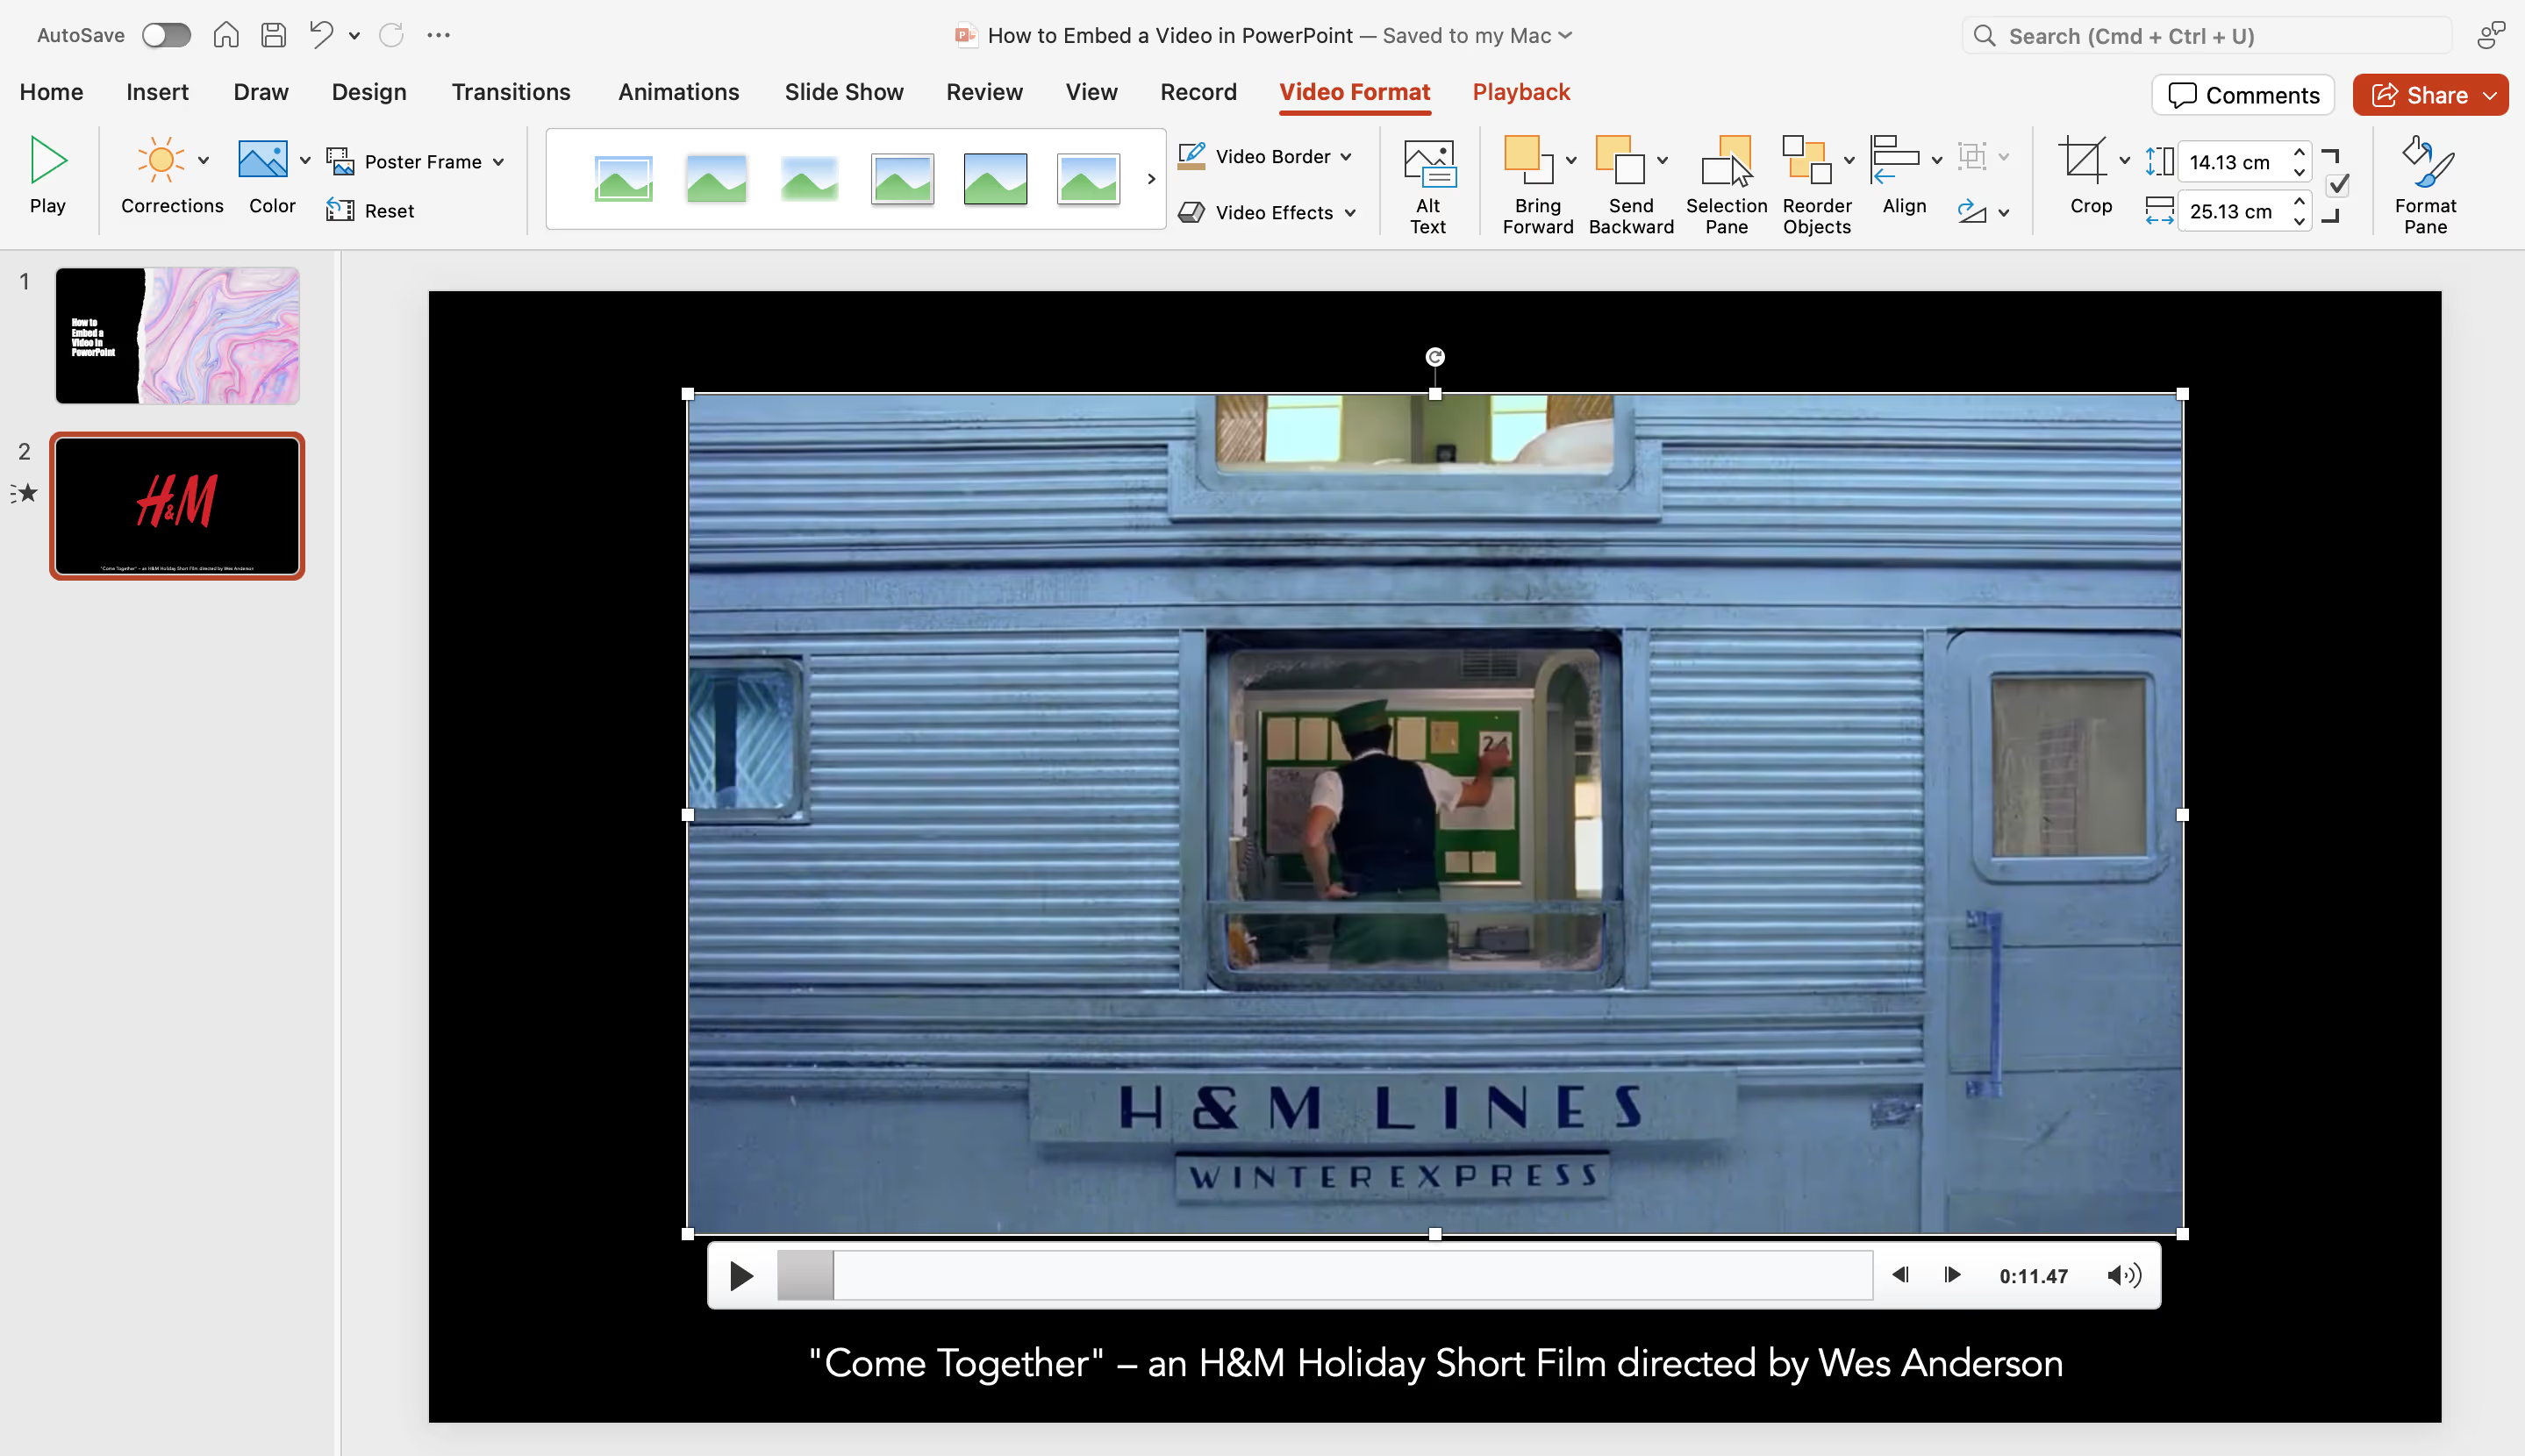
3. Choose File - A dialog box will open; navigate to your video file (MP4 format works best) and click Insert.

4. Position and Resize - Click on the video to resize or move it as needed.
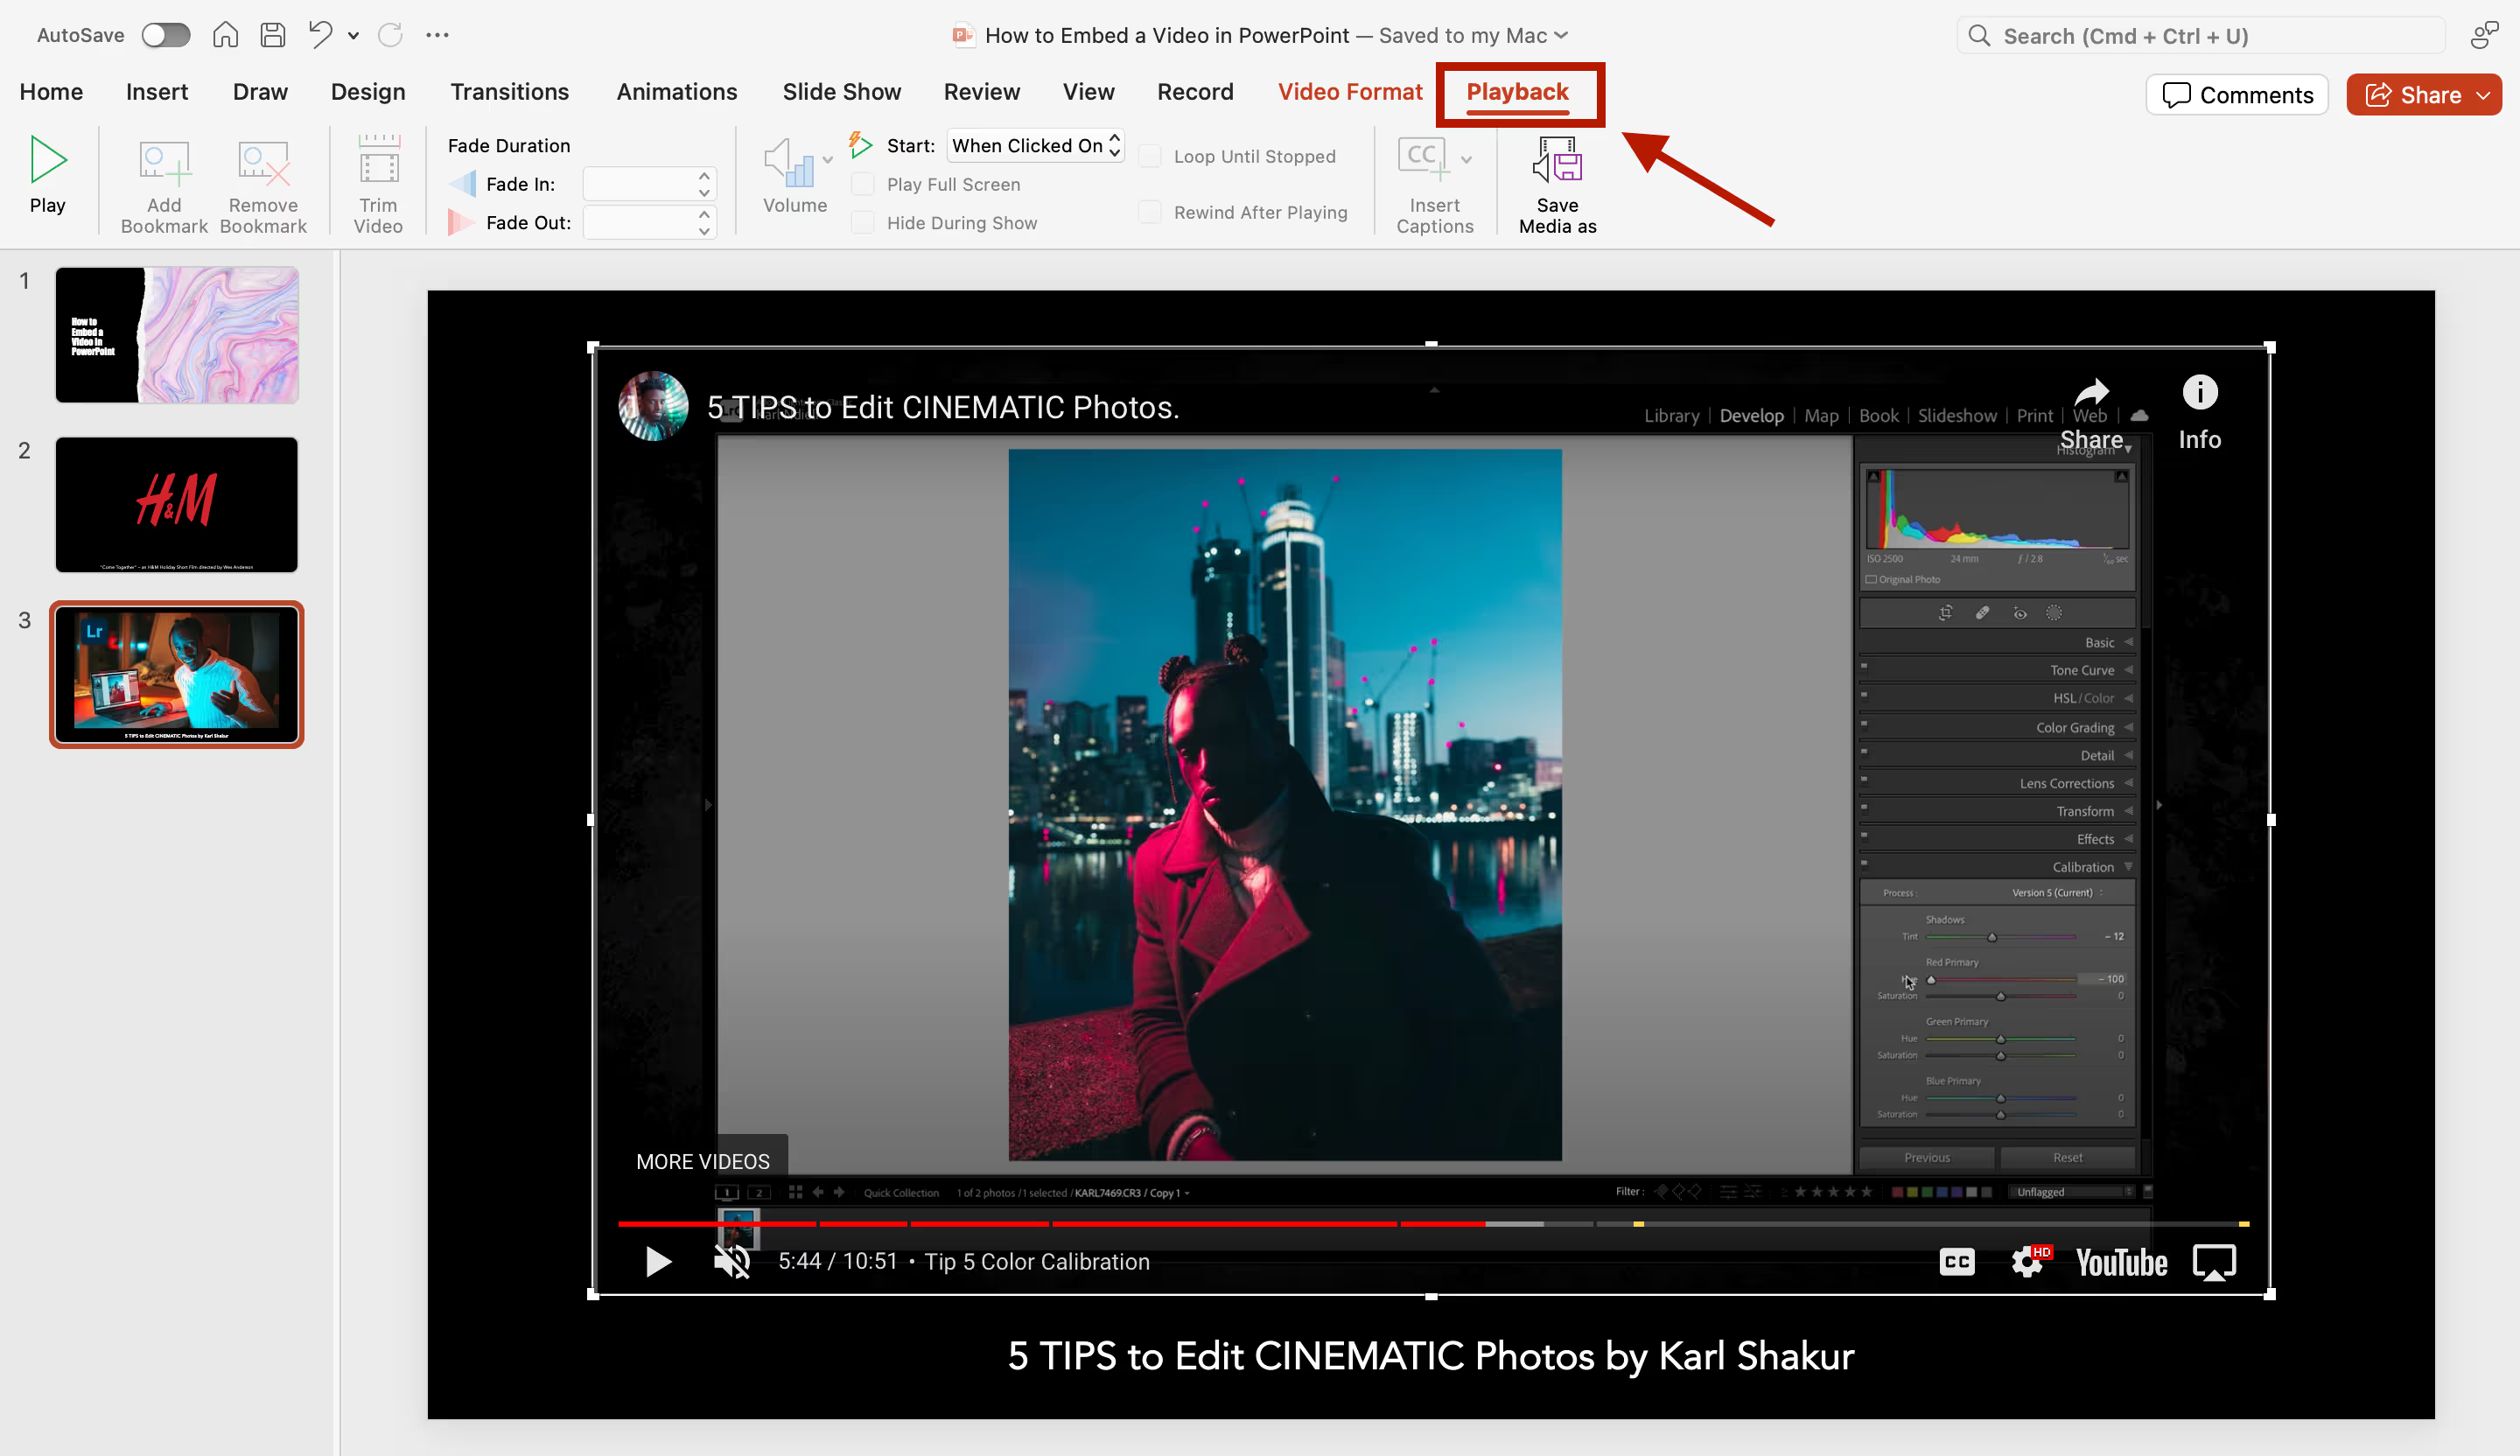
5. Set Playback Options: Go to the Playback tab and adjust playback settings, like whether the video plays automatically or on click.
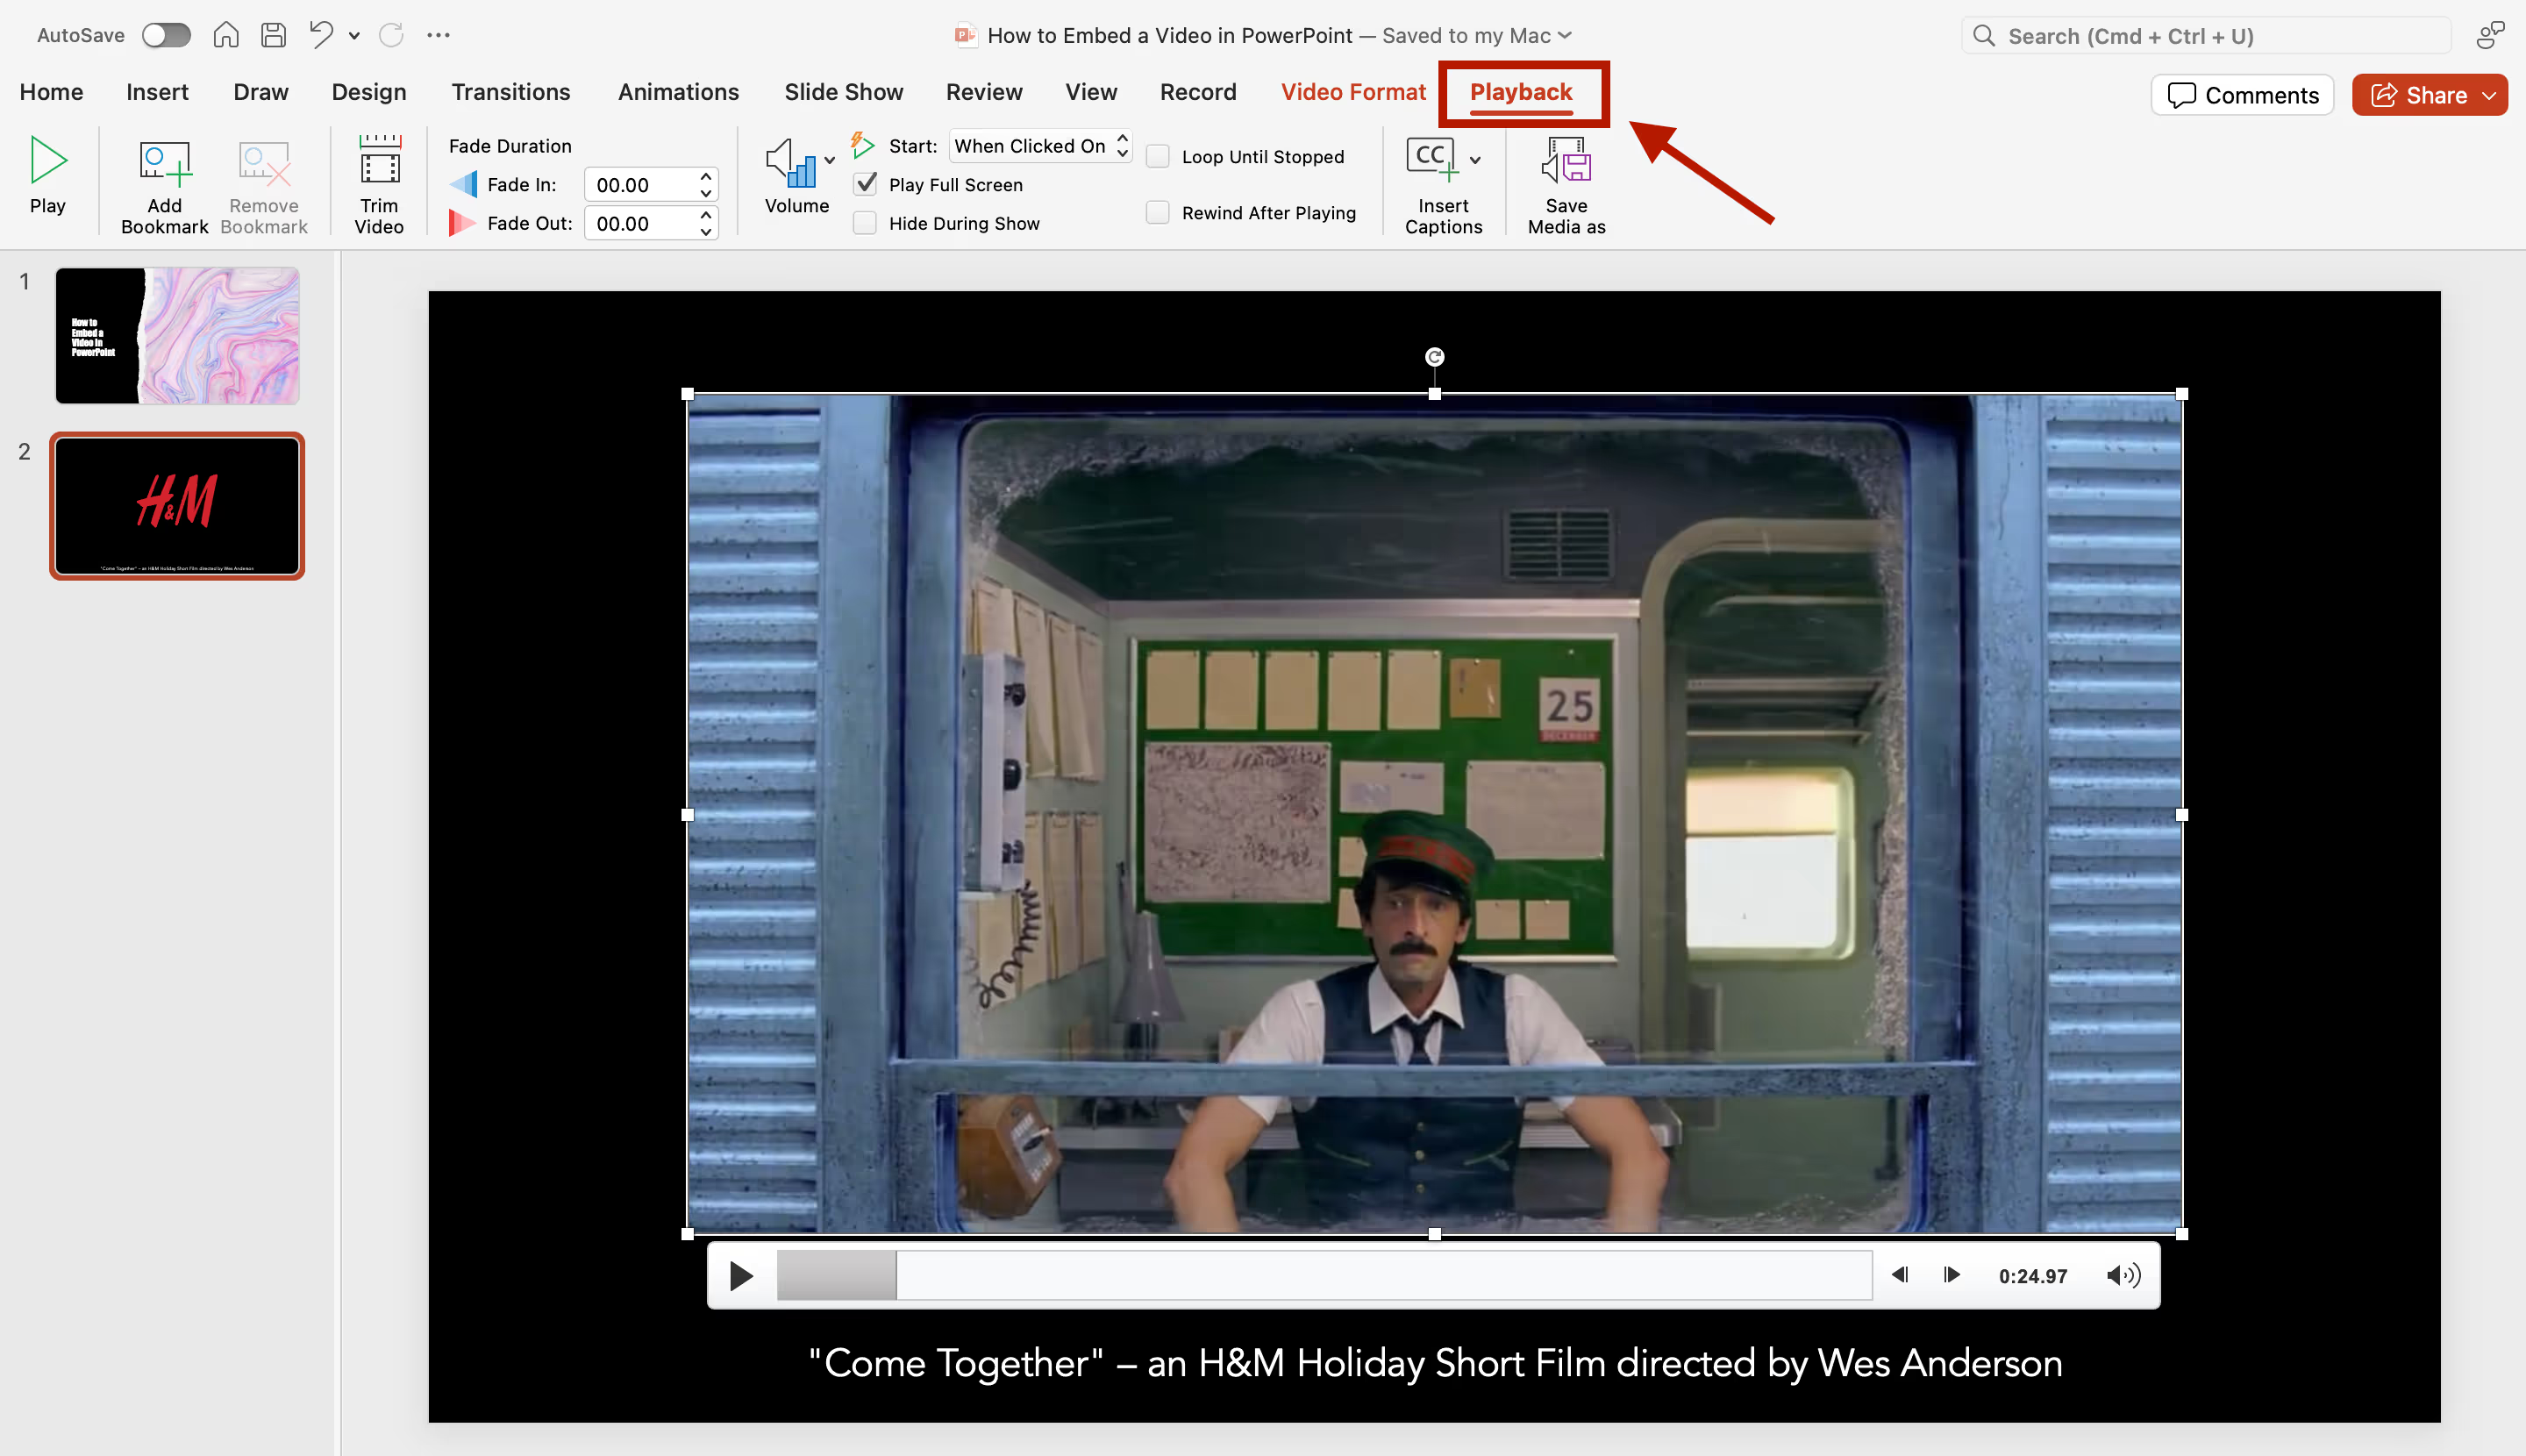
You can also:
• Trim the video
• Add fade-in/out effects
• Play full screen or hide the video during the show
• Loop the video to play continuously
Pros
- Offline Playback: Videos play without needing internet.
- Quality Control: Since it’s stored locally, there’s no worry about streaming quality.
- Playback Customisation: Allows setting playback options, volume, and even looping.
Cons
- Large File Size: Larger videos can make your presentation run slower.
- Format Limitations: PowerPoint doesn’t support all video formats, so sticking to MP4 or MOV is best.
- Styling Options: You get basic editing but not the advanced customisation of some online platforms.
Tips
- Compress the Video: Reducing file size before embedding can keep your presentation light.
- Keep Clips Short: If you’re using multiple videos, trimming can help keep the file manageable.
- Use Compatible Formats: MP4 is widely supported and plays reliably across different devices.
Method 2: Embedding YouTube or Vimeo Videos
Embedding from YouTube or Vimeo allows you to link to online video content directly, keeping your file size smaller. This is useful if you want to use content that’s readily available online, like tutorials, trailers, or presentations. Keep in mind this method requires internet access to play the video.
Steps:
1. Find Video - Locate the video on YouTube or Vimeo. Click the Share button below the video and copy the URL, or just grab it from the address bar.
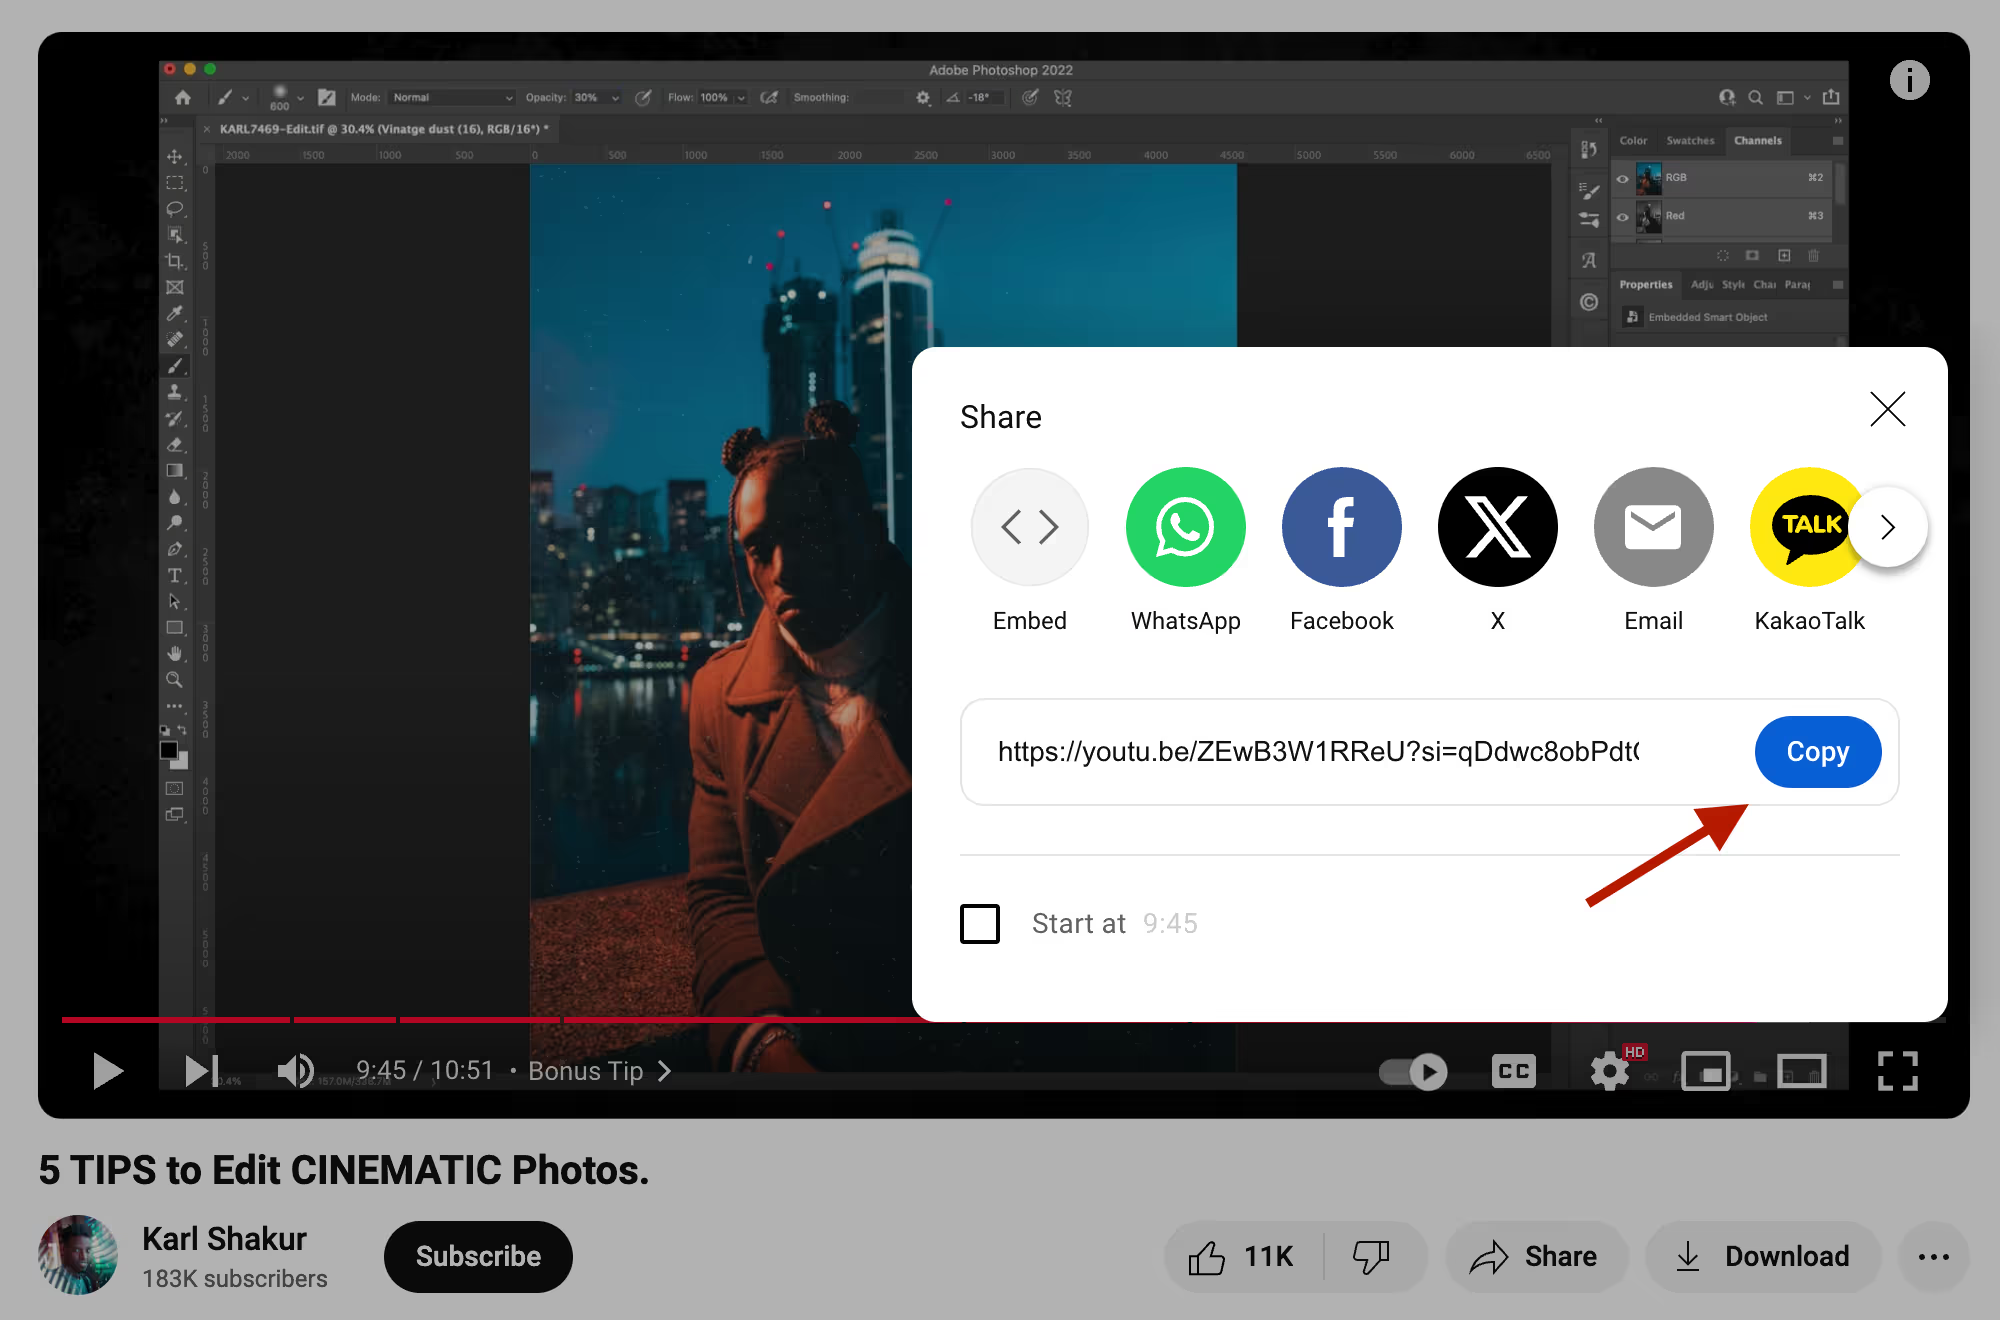
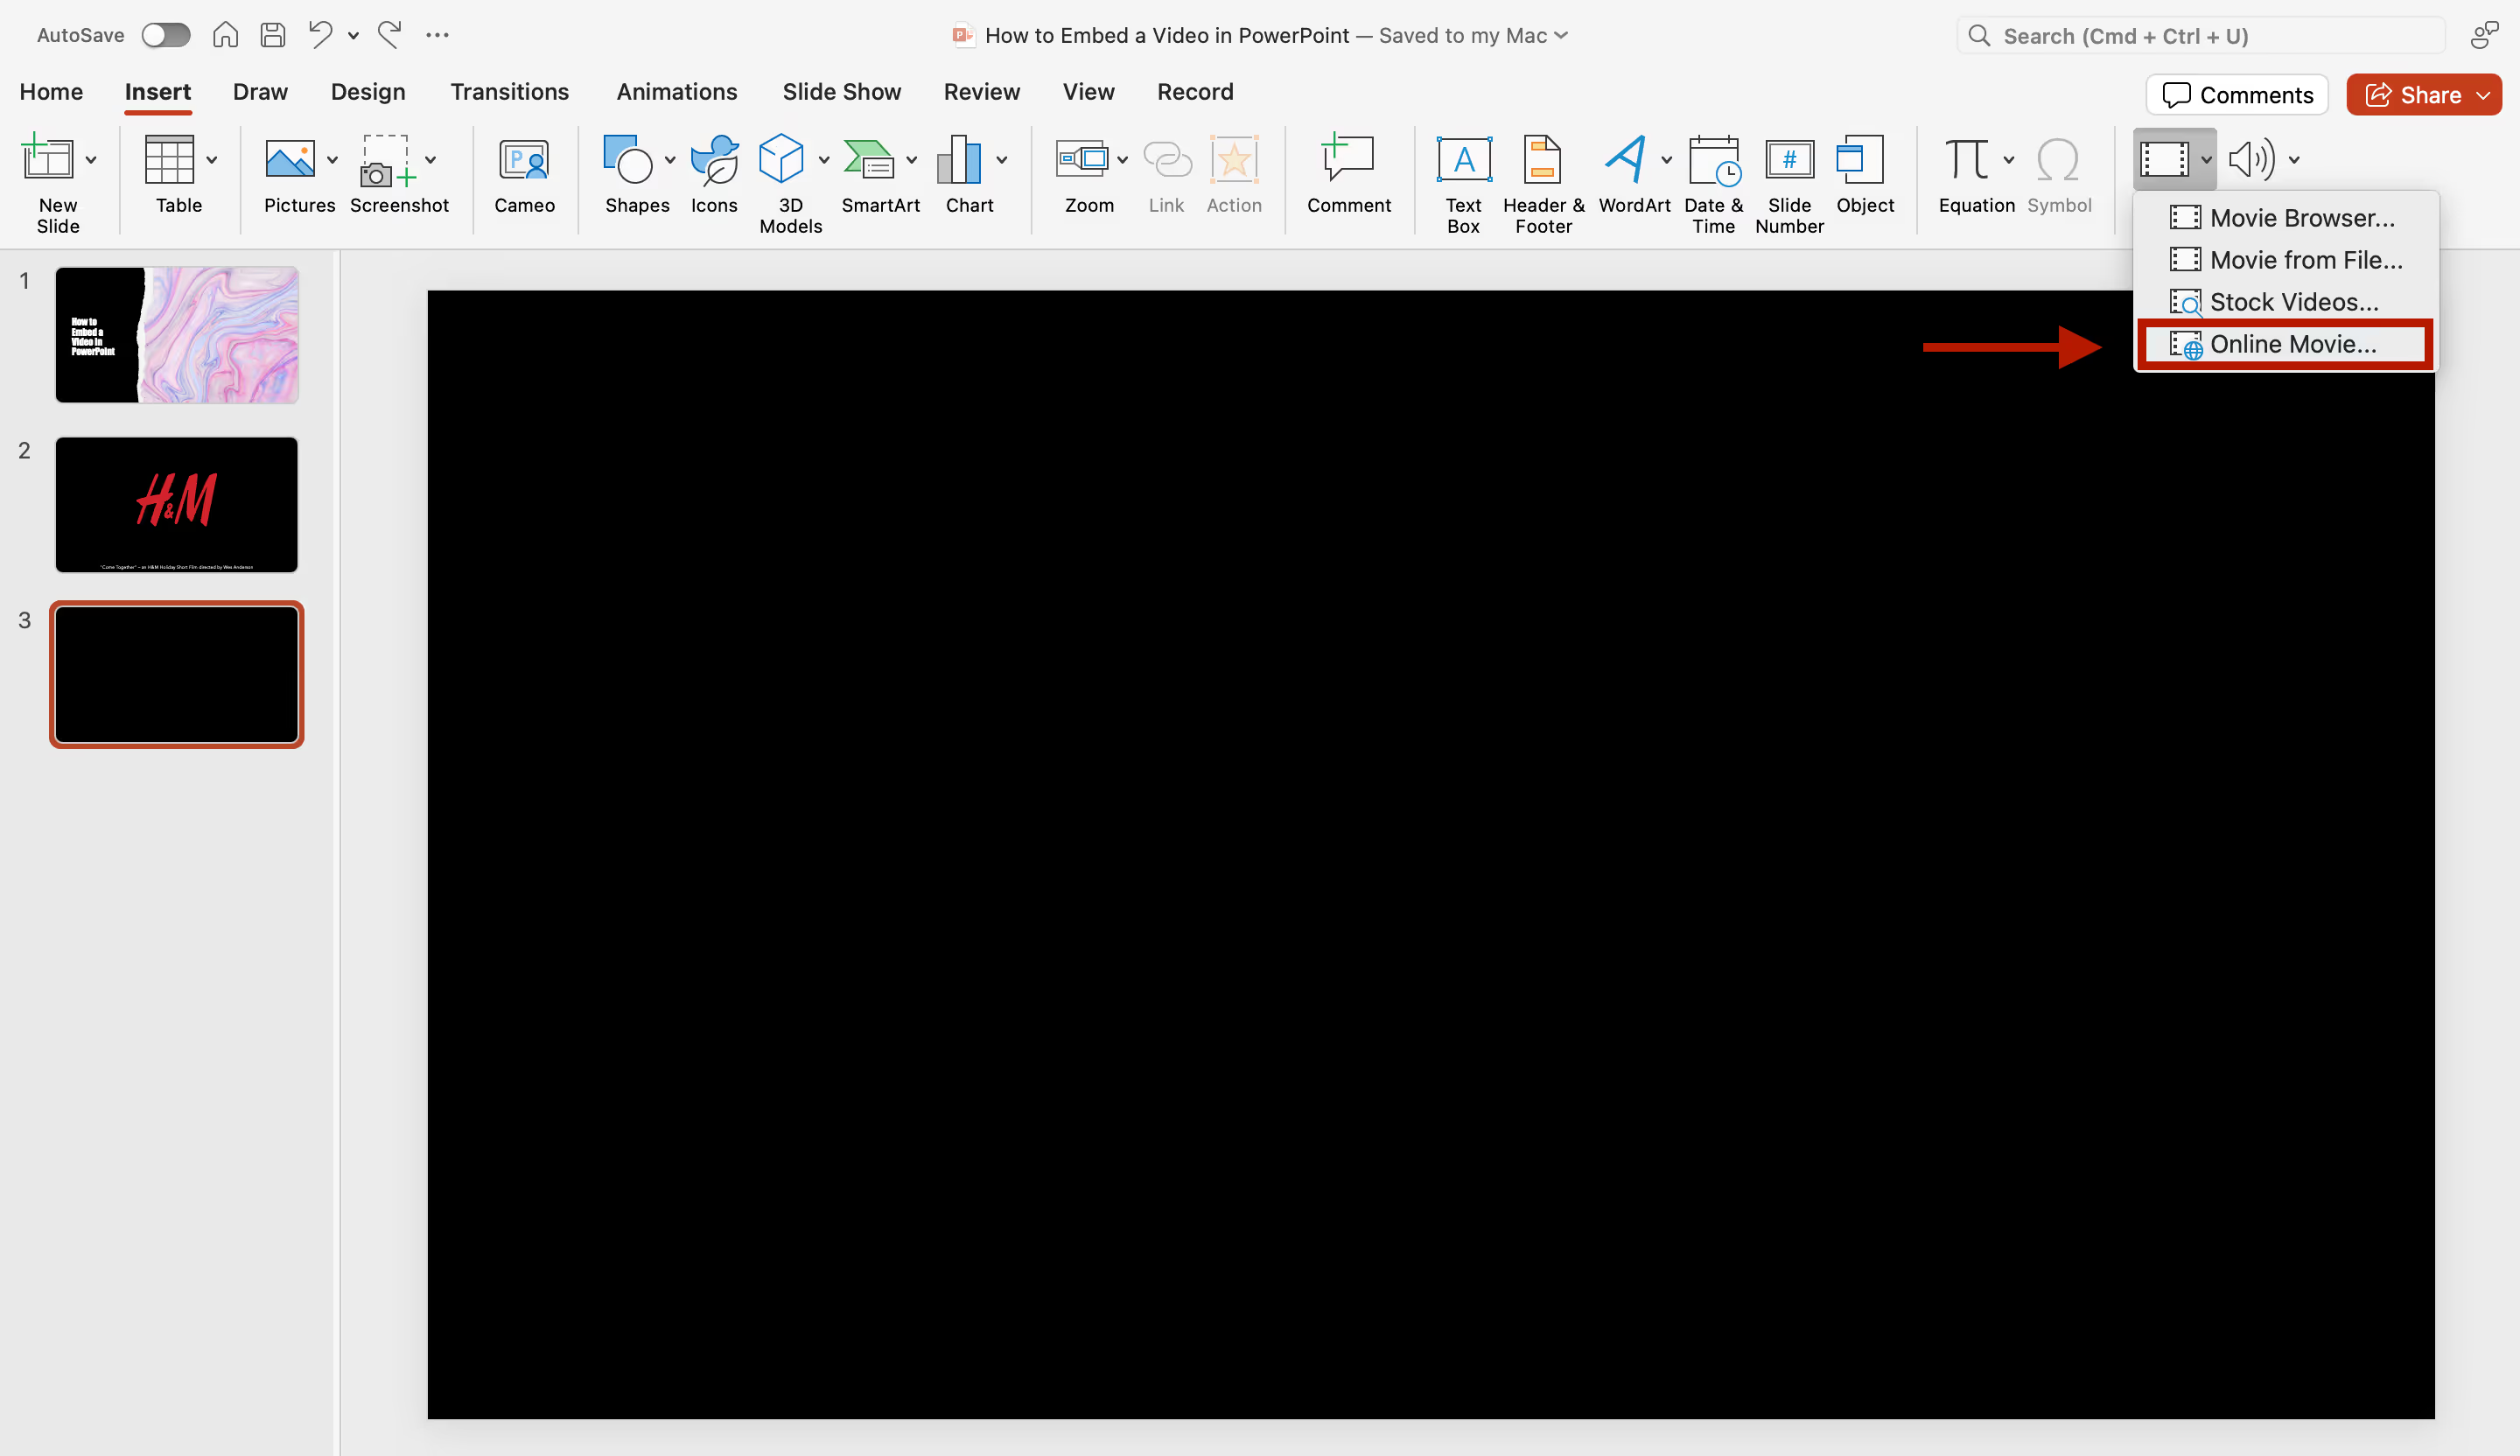
2. Insert Online Video - In PowerPoint, go to Insert > Video > Online Movie.
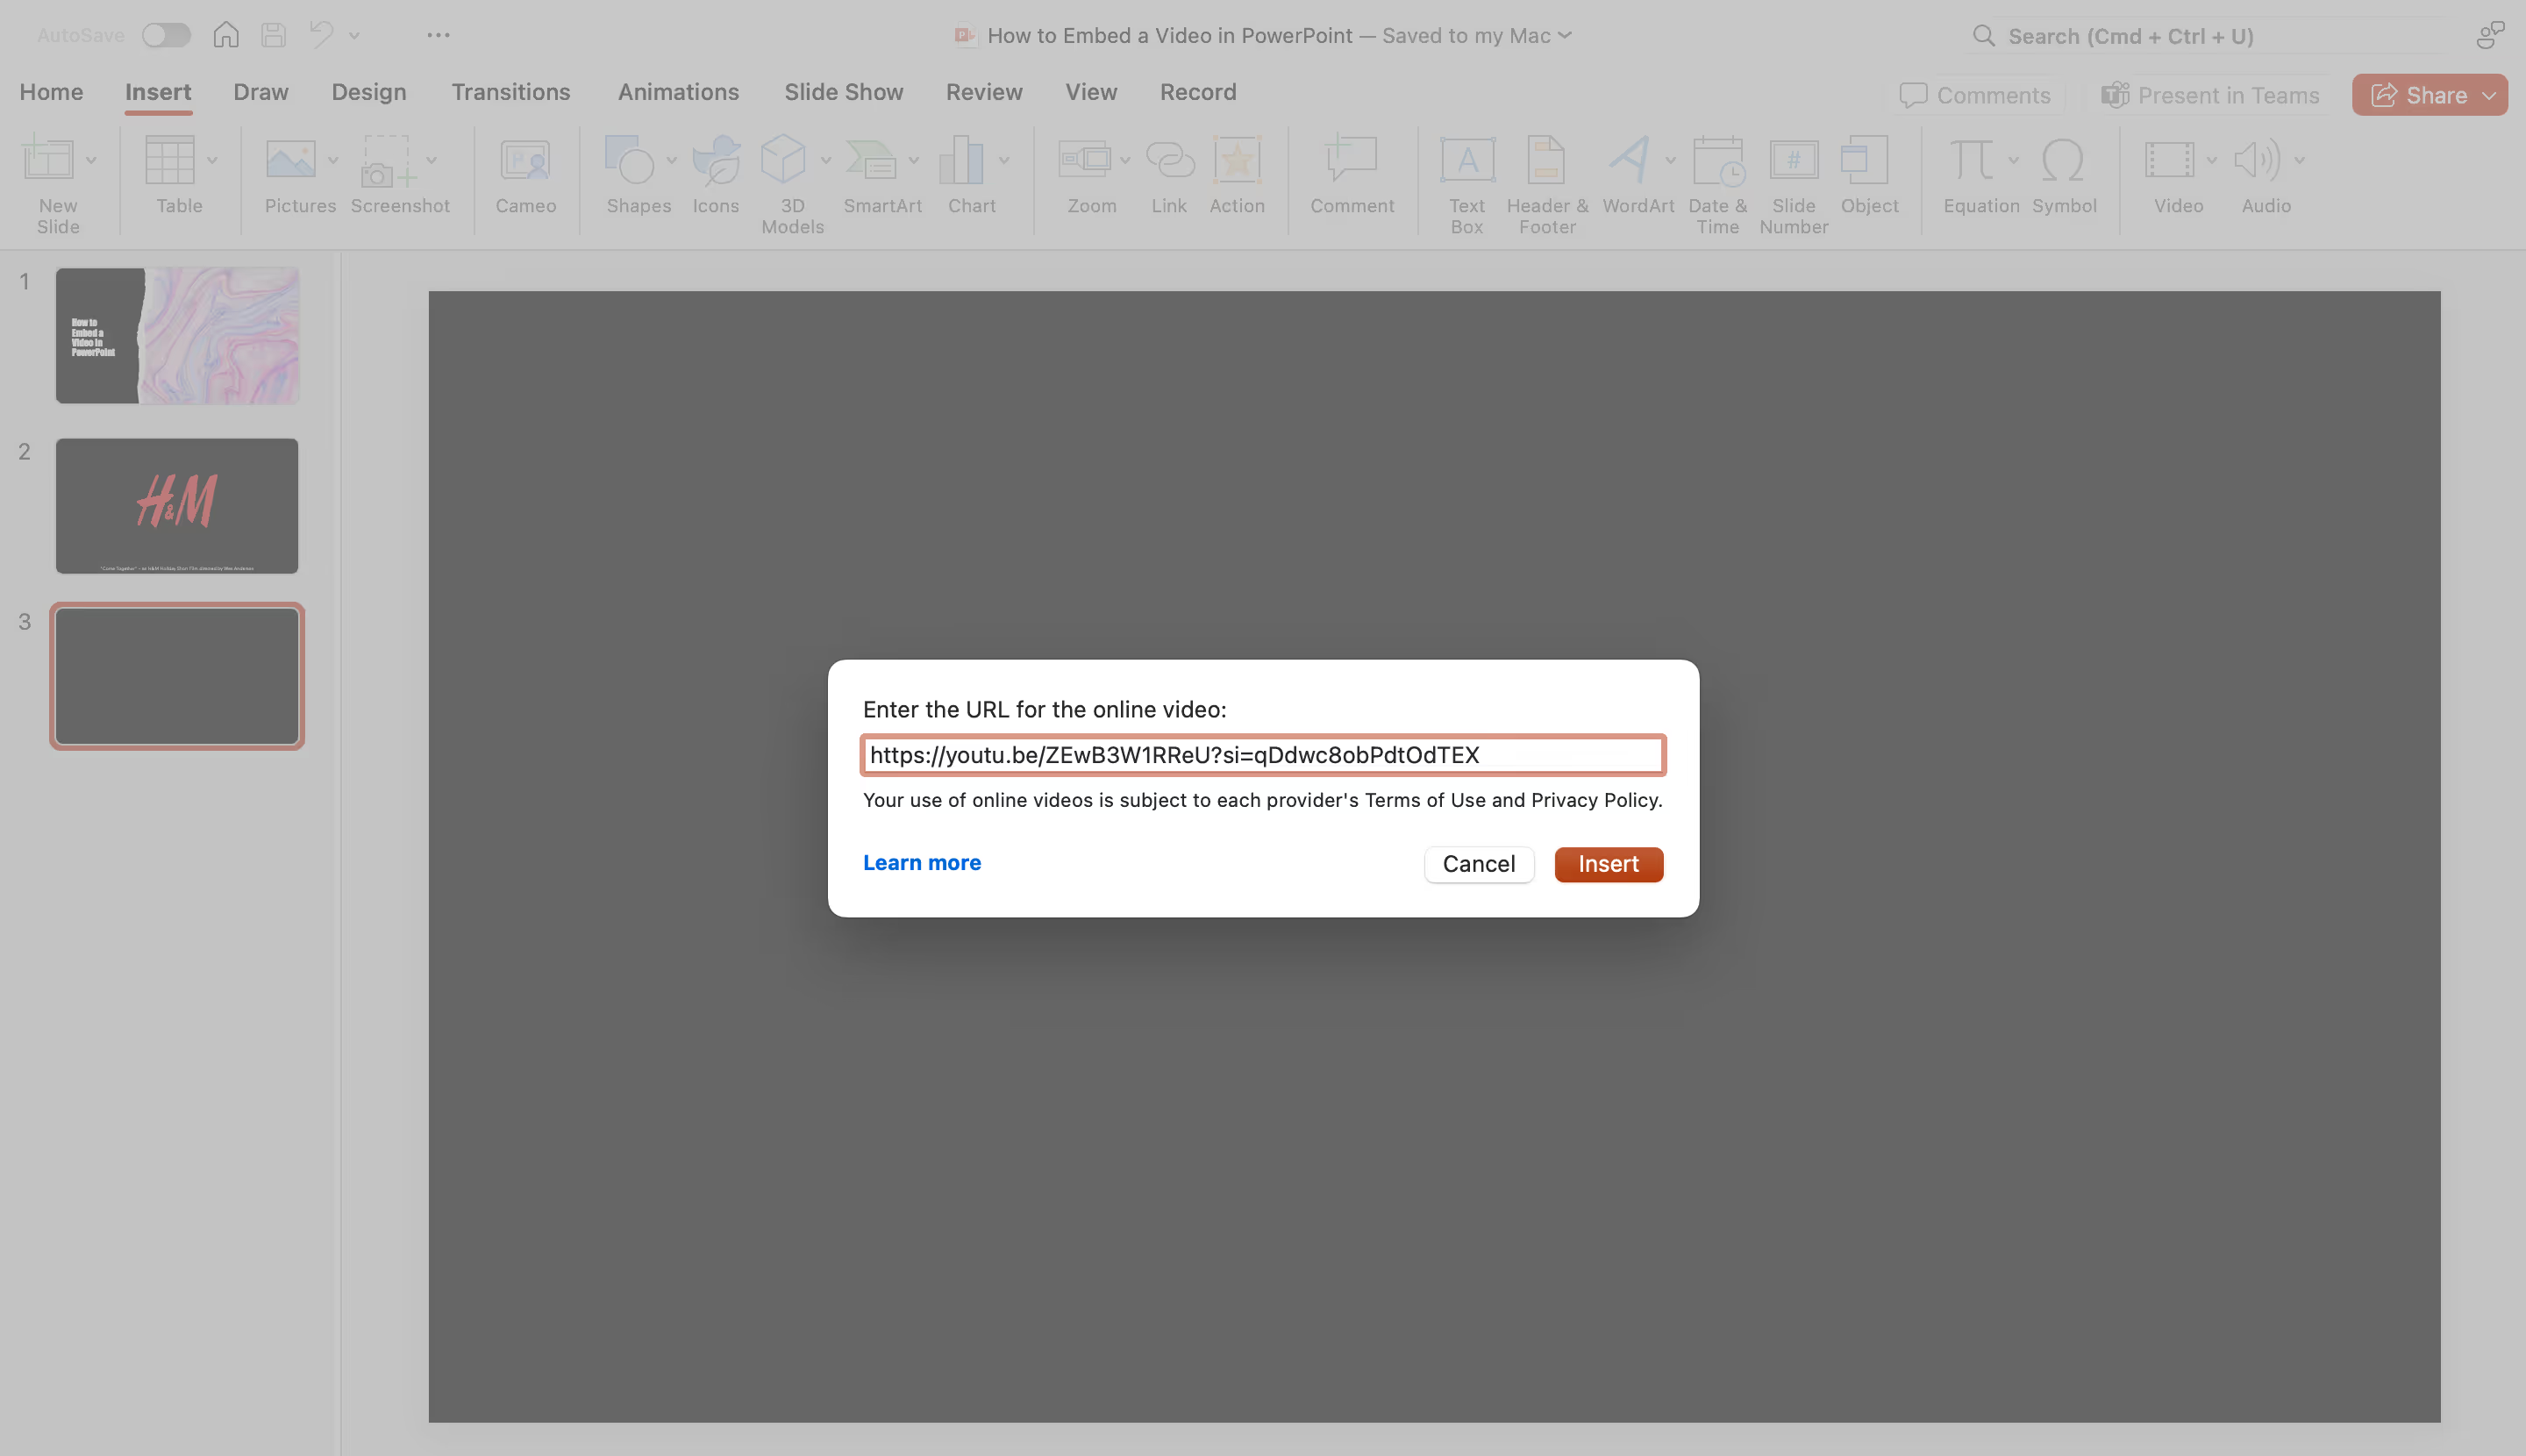
3. Paste URL - Paste the copied URL into the dialog box and click Insert. PowerPoint will insert the video frame onto your slide.
4. Adjust Size and Position - Click and drag to resize or reposition the video as needed.
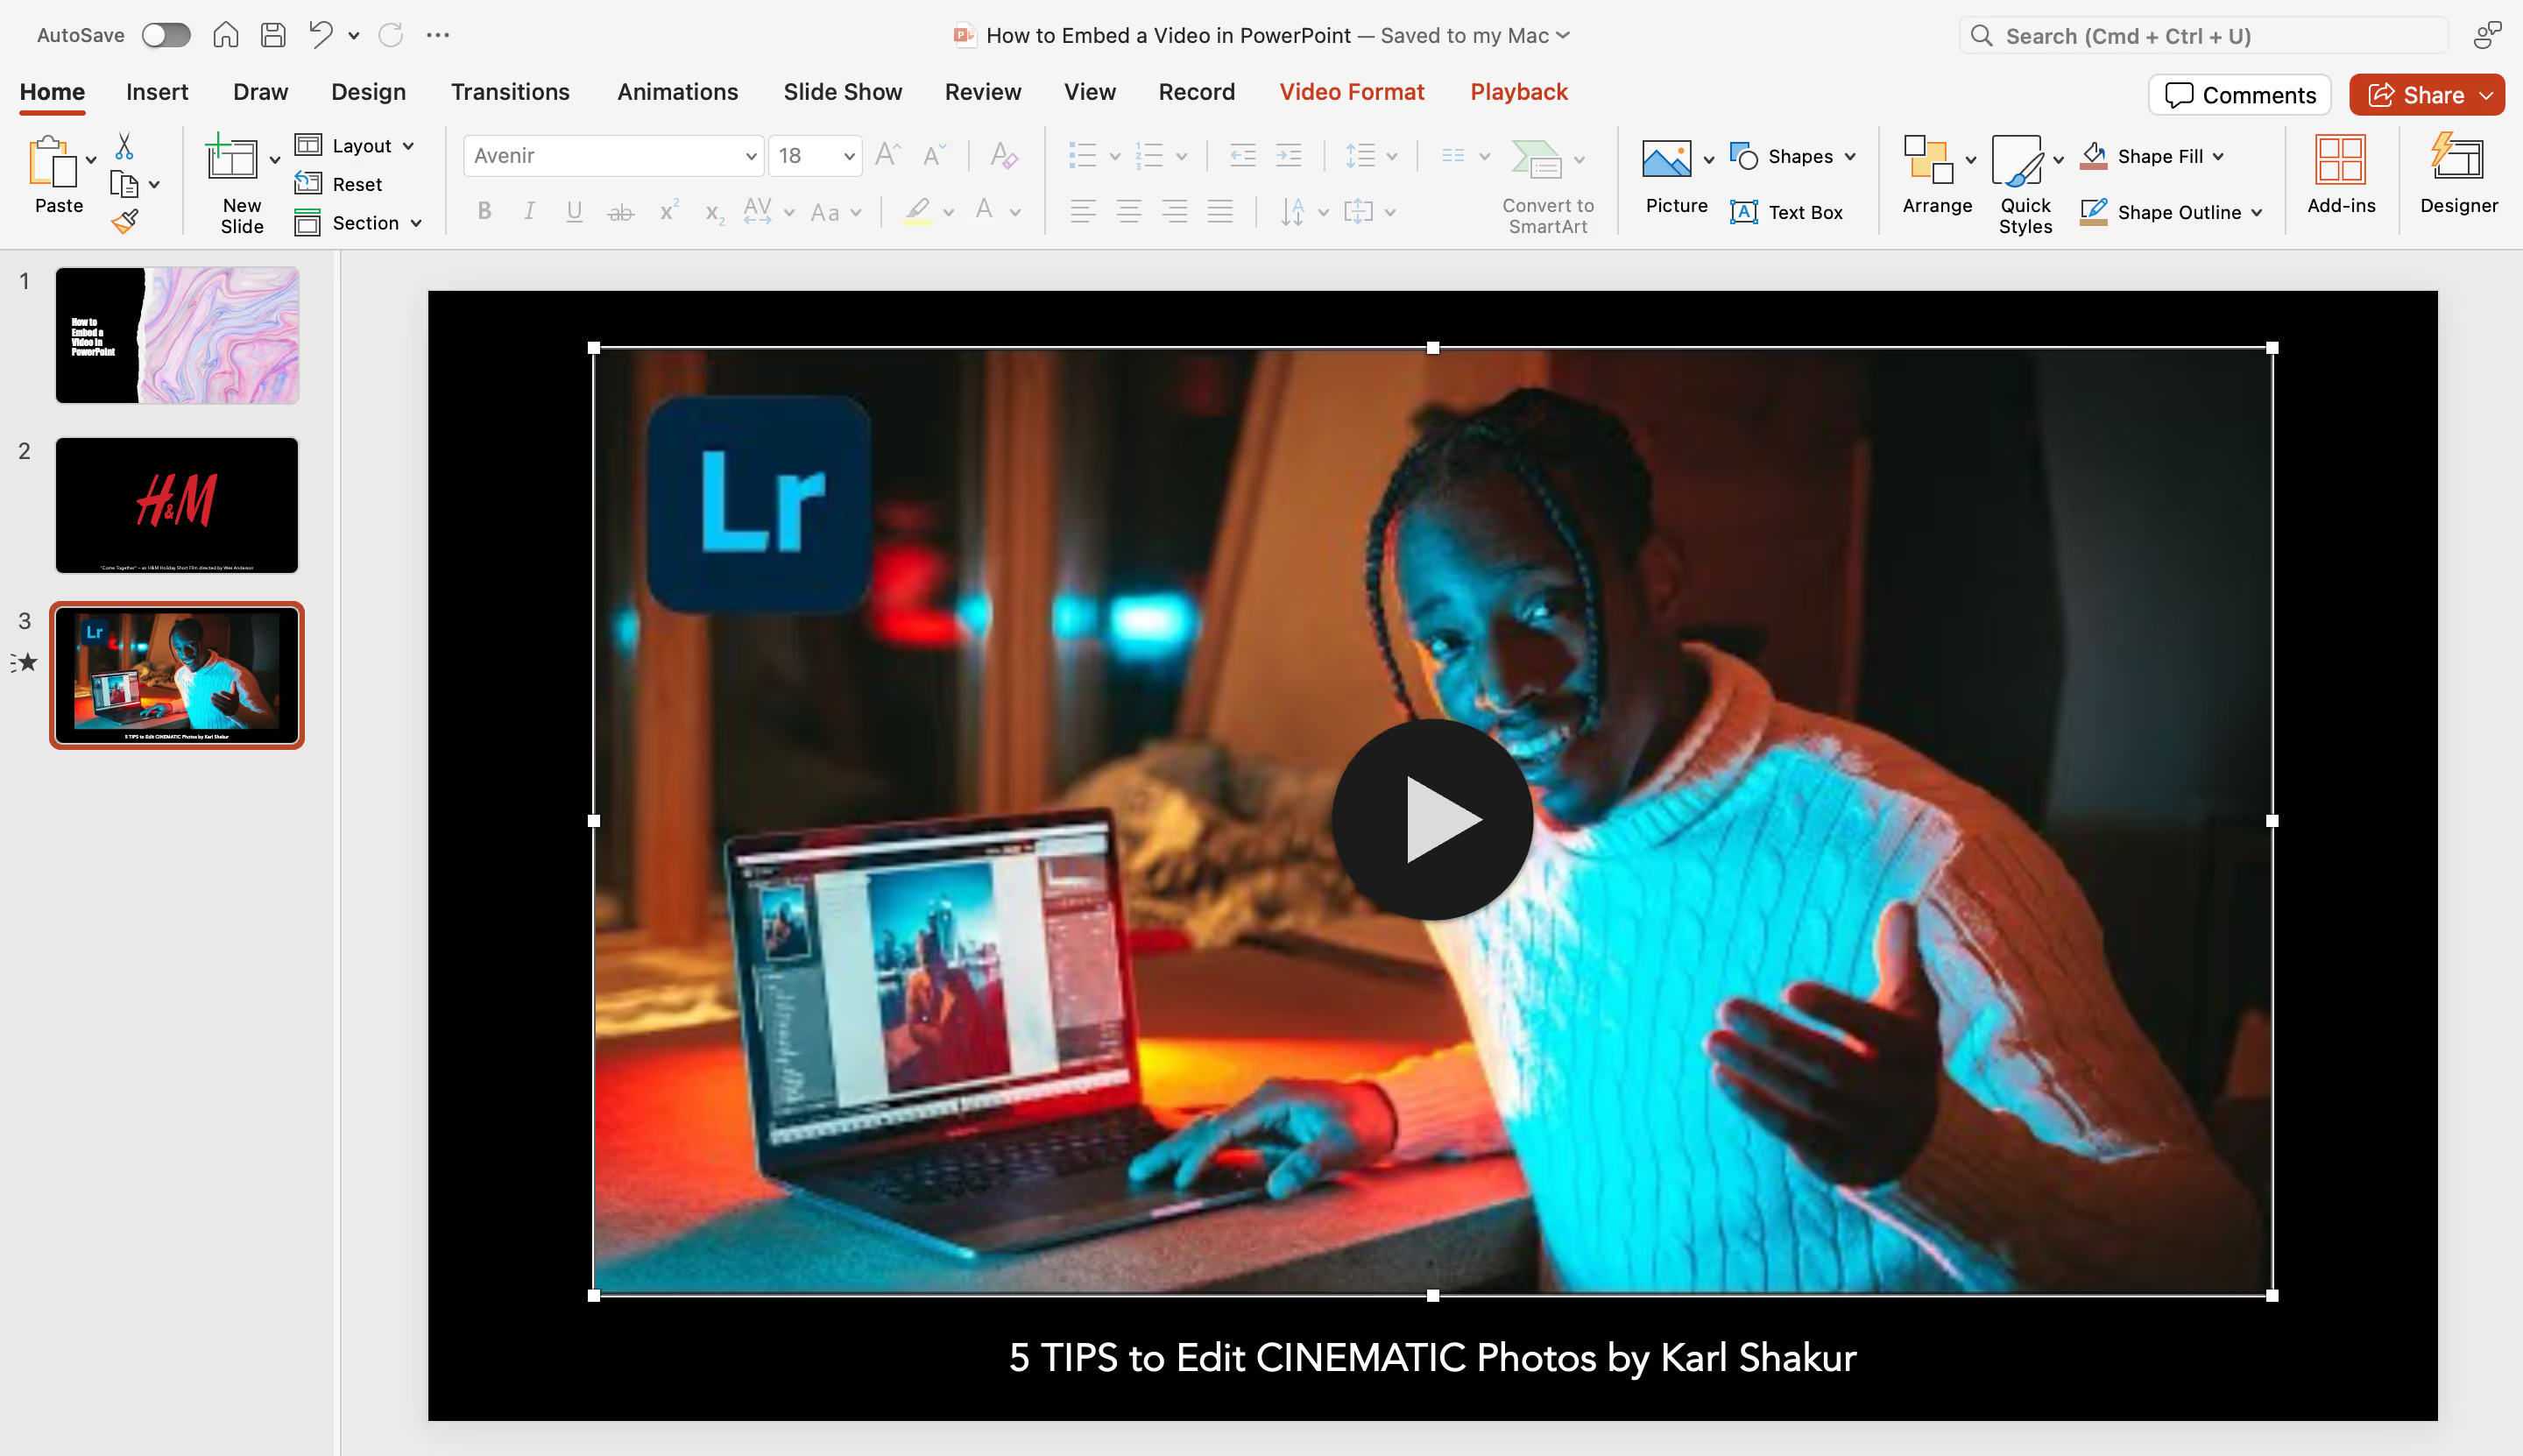
5. Test Playback - Go to the Playback tab to set options for the video, like whether it should play automatically or on click. Make sure to test it out to ensure it runs smoothly with a good internet connection.
Pros:
- Access to Online Content: Tap into a wealth of videos available on platforms like YouTube
- No Size Worries: The embedded video doesn’t increase your PowerPoint’s size, making it easier to share.
Cons:
- Requires Internet: You’ll need a stable internet connection to play the video; it won’t work offline.
- Lacks customisation: Embedded videos display as they appear on the platform without added styling.
- Ads and Distractions: Some YouTube videos may have ads or links to other content.
Tips
- Check for Ads: Preview the video beforehand to ensure there are no ads that might pop up during your presentation.
- Confirm Internet Access: Always make sure you have a reliable internet connection where you’ll be presenting.
- Consider Offline Options: If you might present without internet, look into downloading the video (if allowed) or finding ad-free options for a smoother experience.
Create seamless video experiences without code with Clipara.
Start using Clipara for free and create video experiences that delight your customers.
Get started freeMethod 3: Using Clipara to Link to Customisable, Branded Video Content
While PowerPoint doesn’t support playing videos from certain platforms directly, you can create a thumbnail linked to a video hosted on Clipara. This approach maintains the visual appeal of your presentation while directing your audience to the video online. Clipara is an excellent choice for adding polished, branded video content. It allows you to create video carousels or grids, ideal for testimonials, tutorials, or product demos.
Unlike YouTube, which can distract viewers with unrelated content or ads, Clipara offers a seamless viewing experience focused solely on your material. You can customise colors, logos, and CTA buttons to ensure a fully branded experience.
Steps to Embed a Video with Clipara:
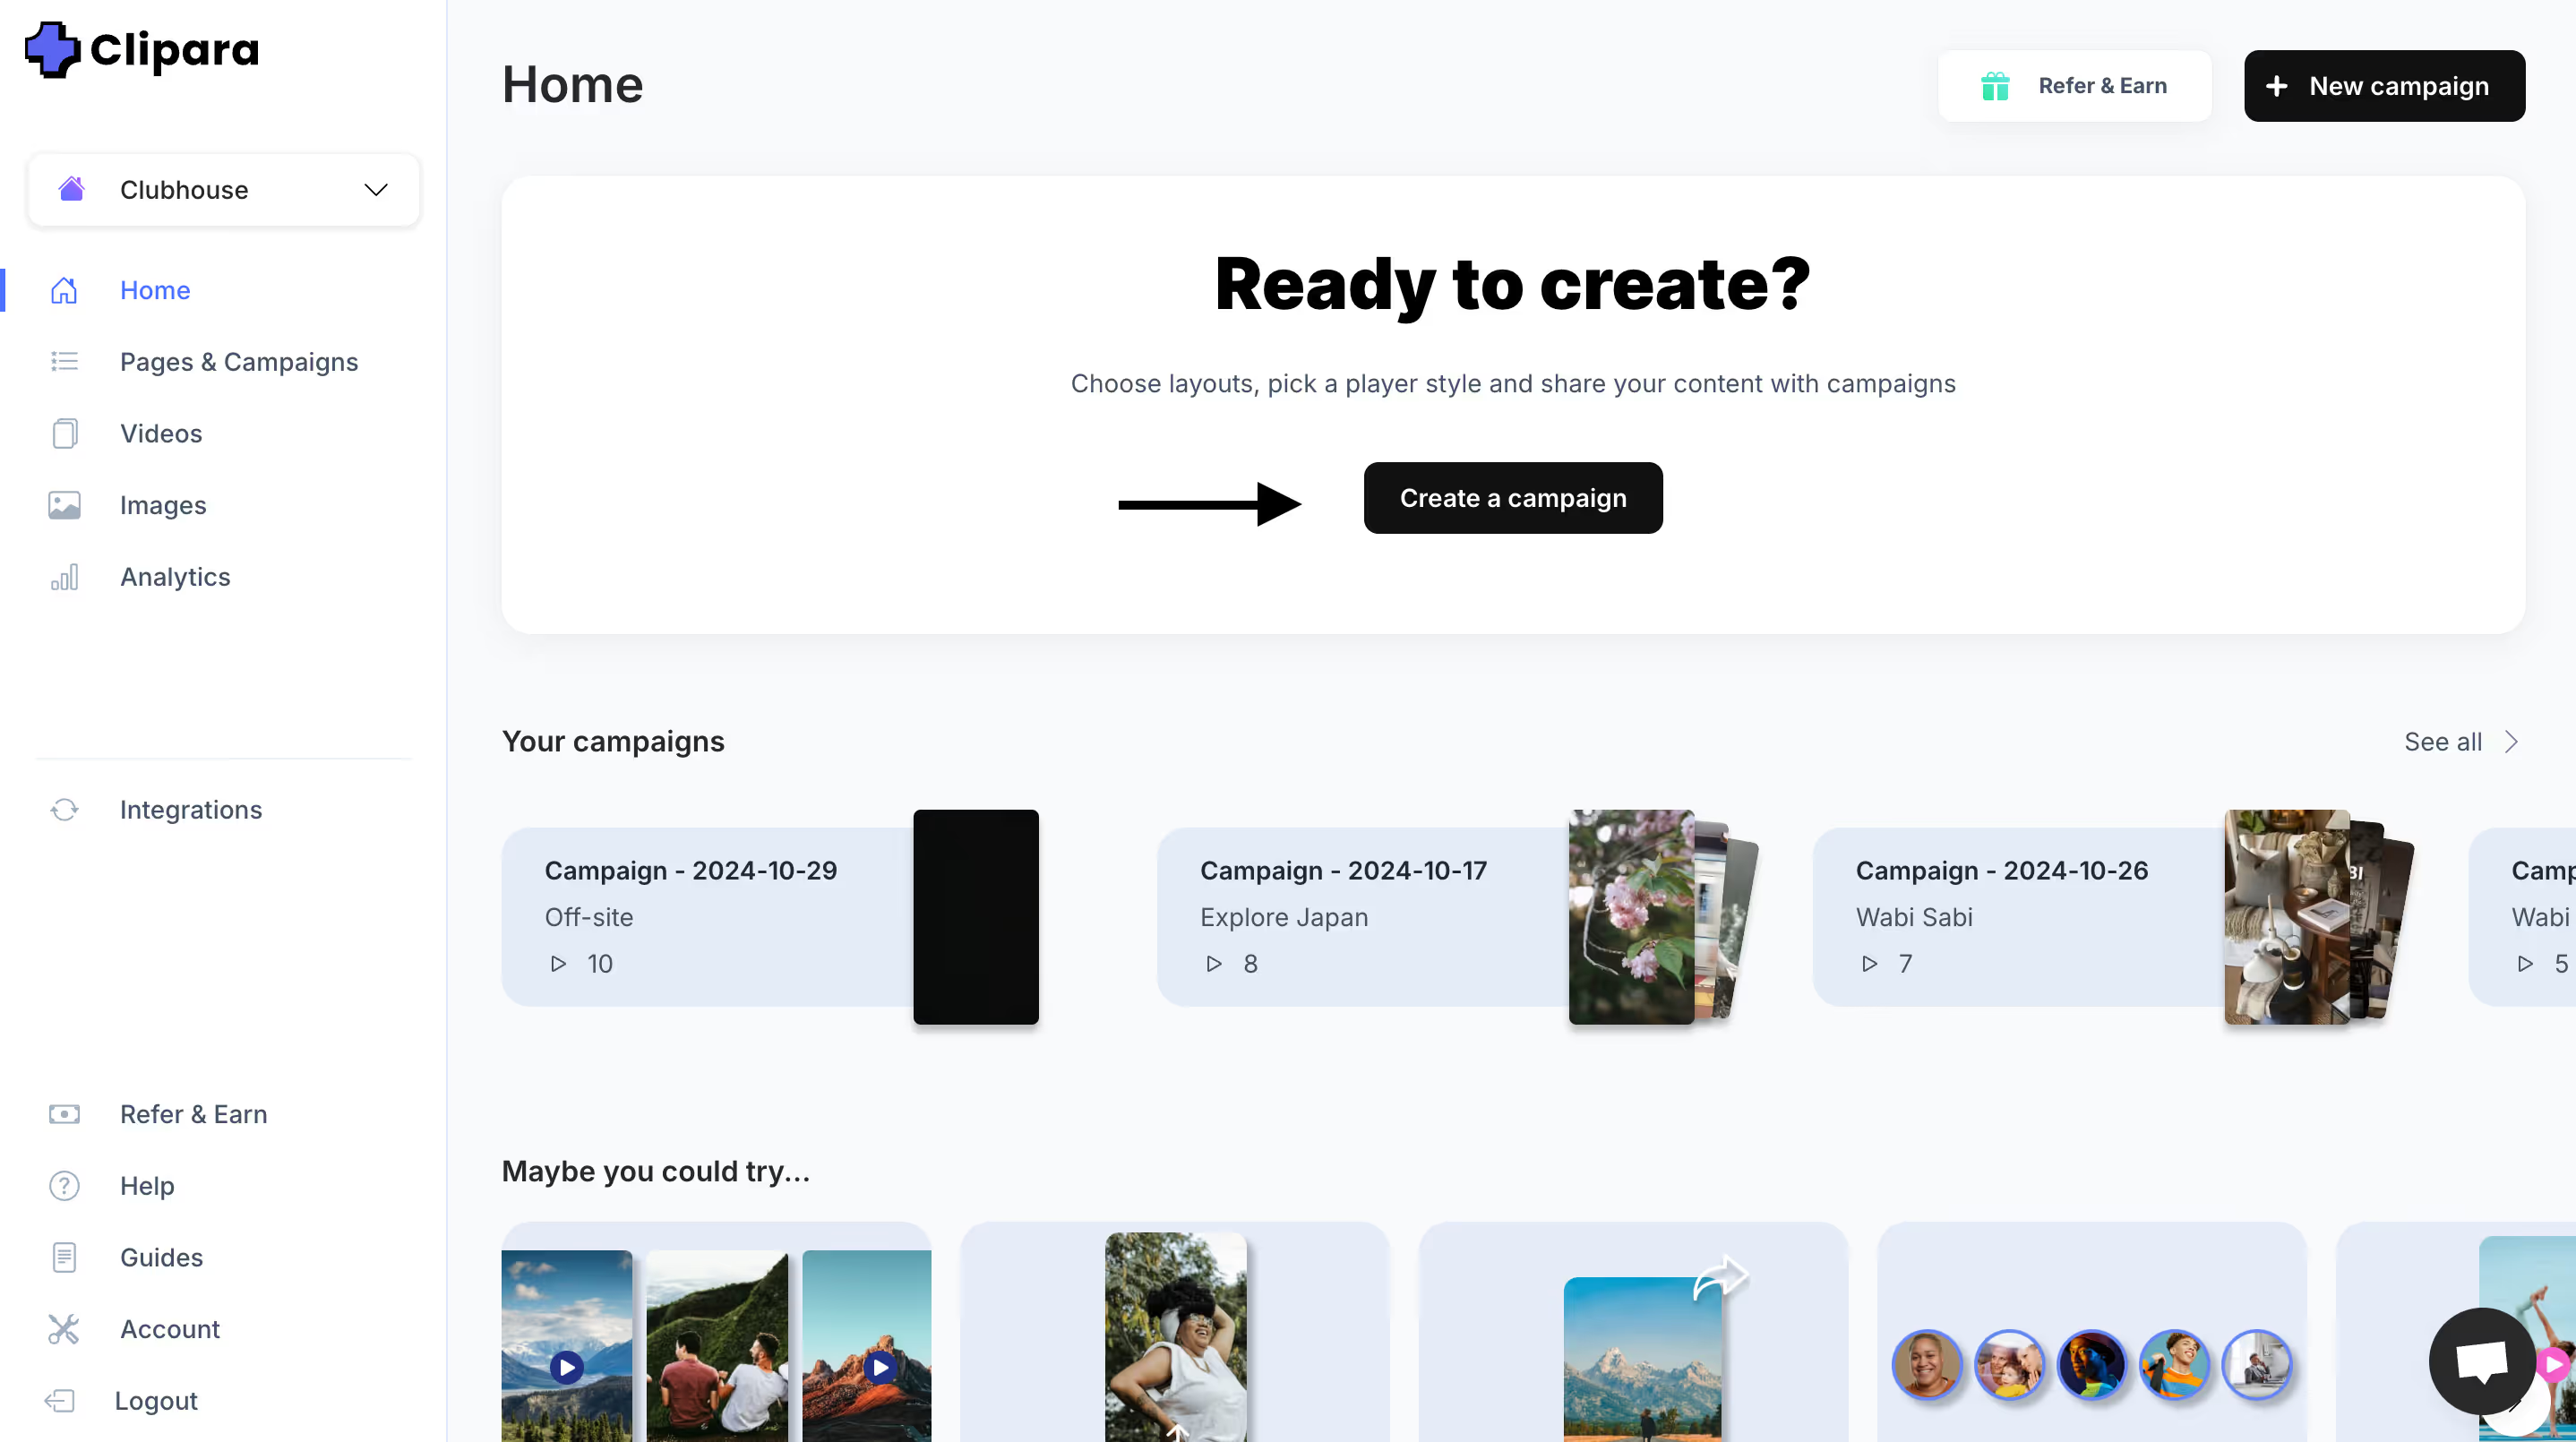
1. Create a Campaign: Start by creating a campaign on the Clipara homepage.
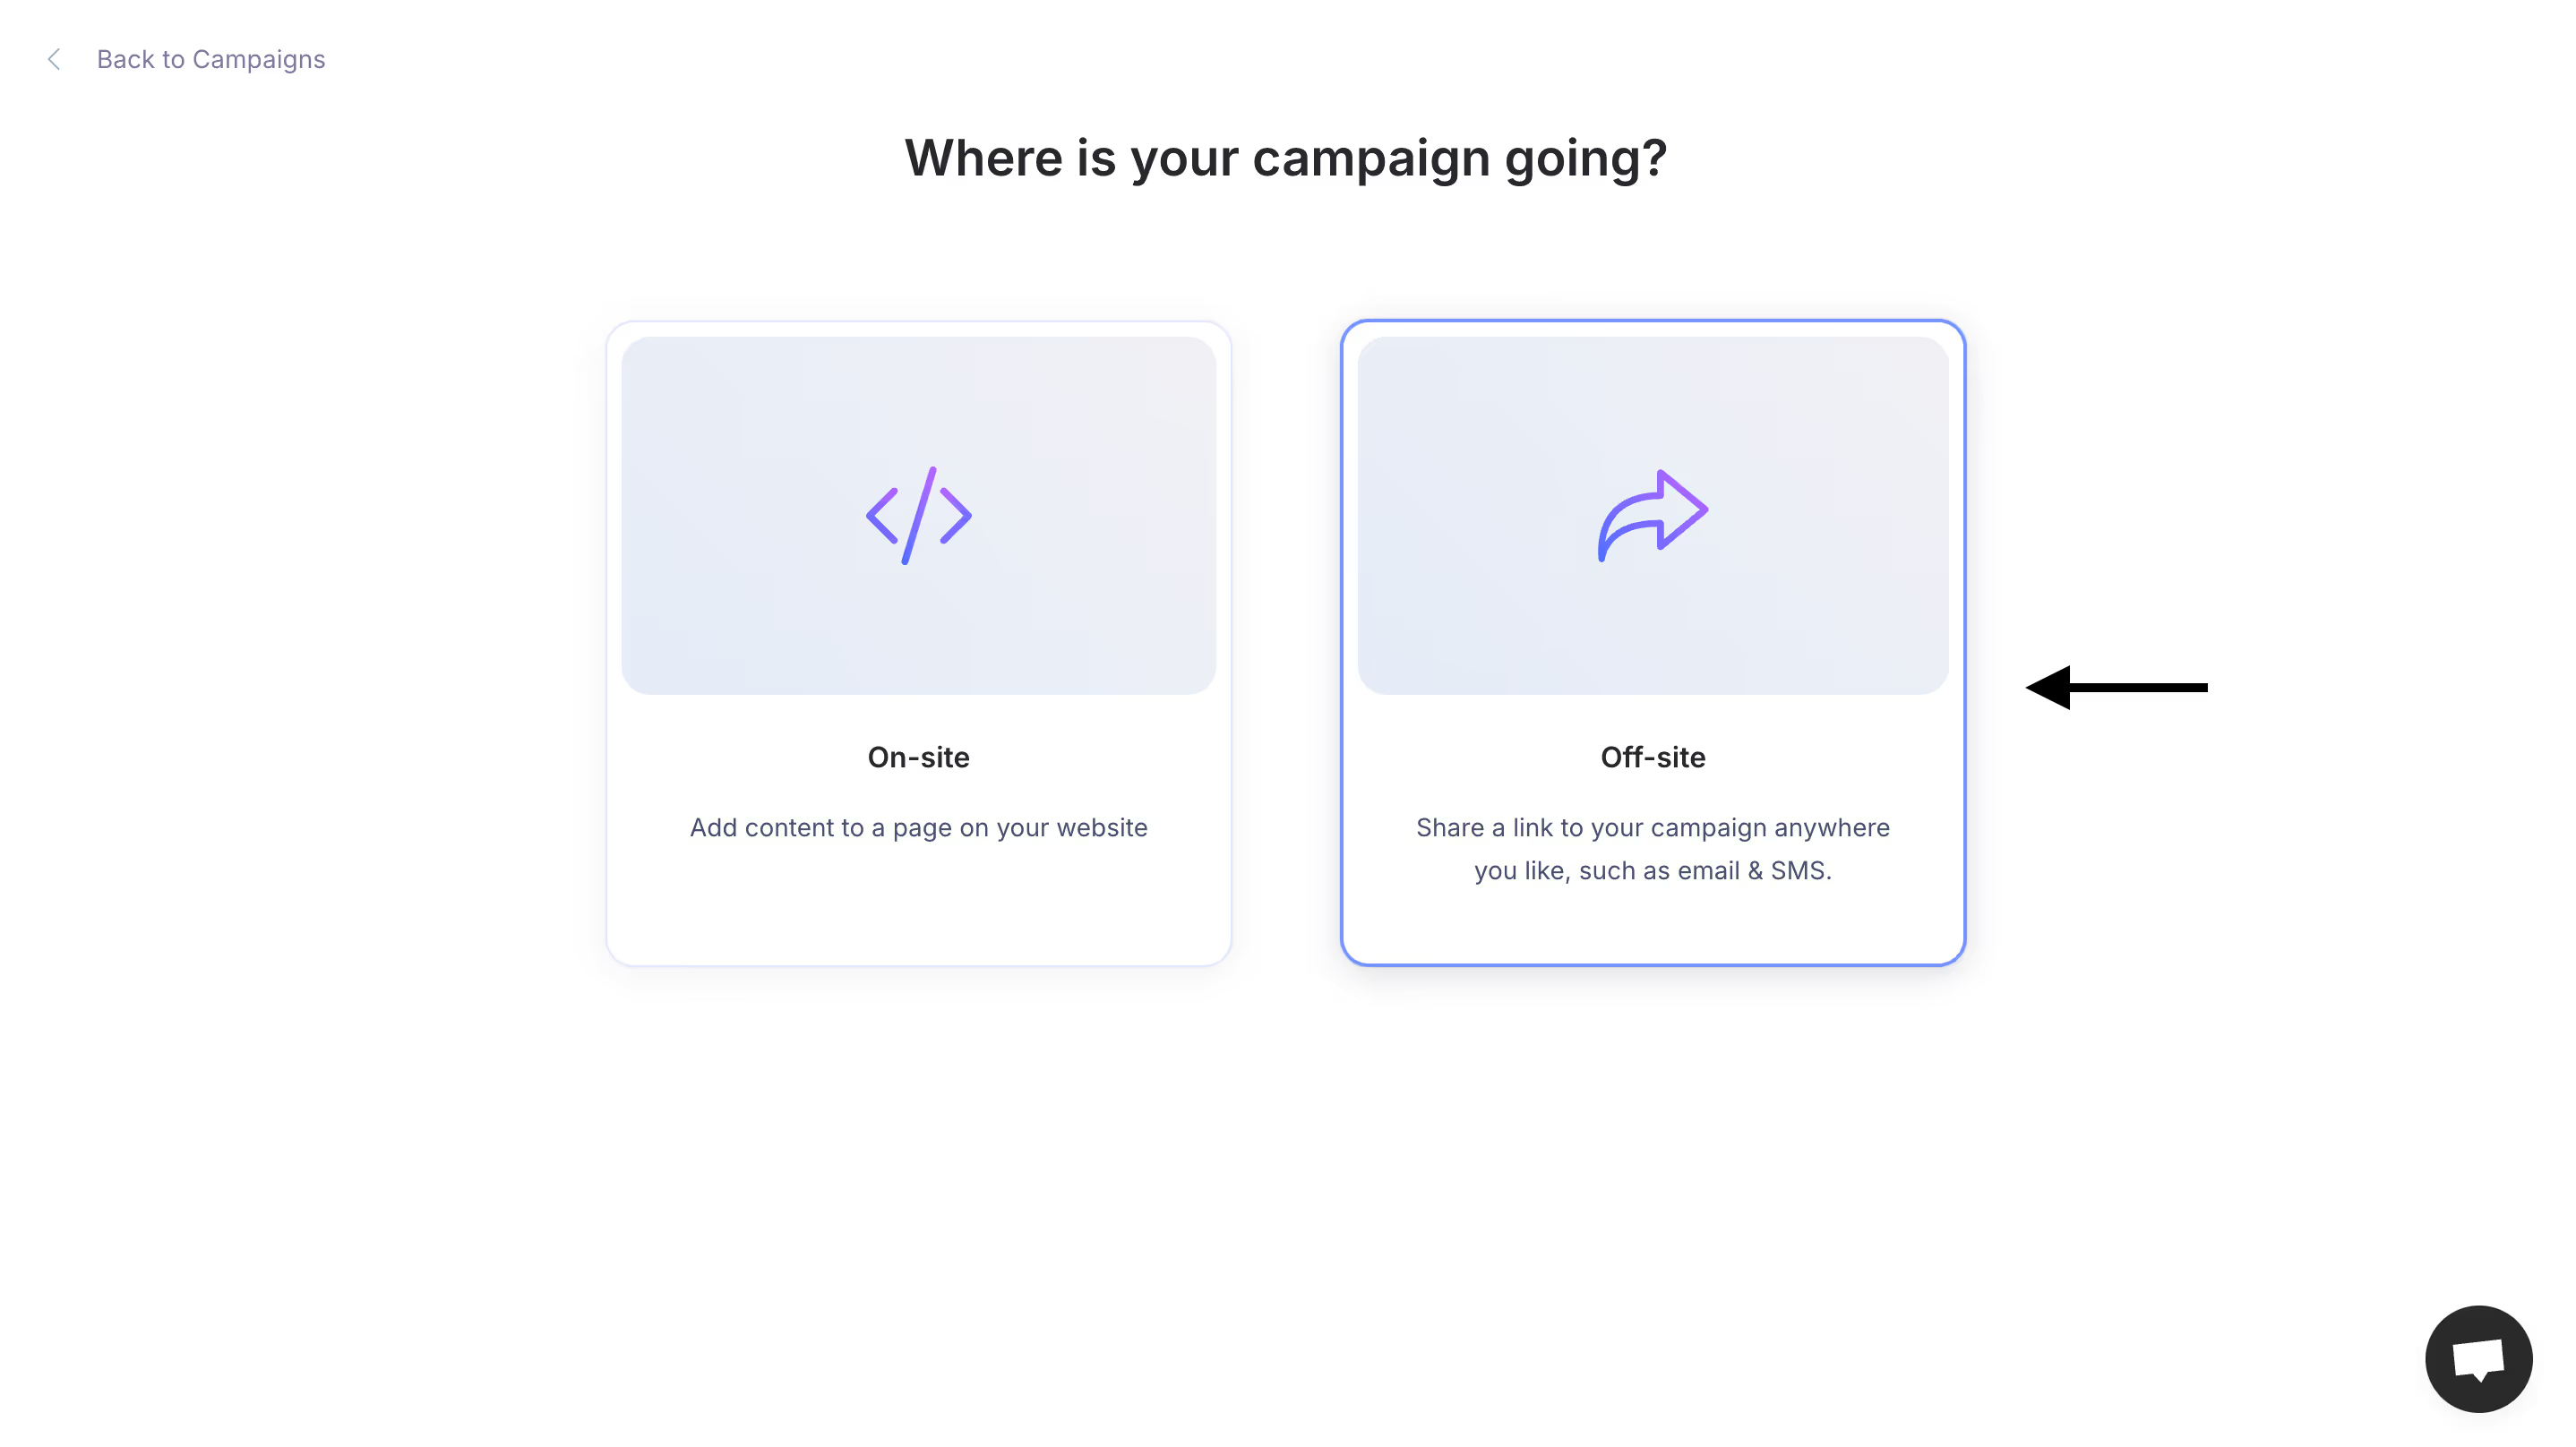
2. Select Campaign Type: Choose the 'Off-site' campaign type.
3. Add Video Content: Click 'Add Video' to upload or select videos from your library. You can also import videos from Instagram, TikTok, and YouTube by pasting the video URL.

You can even pull in videos directly from Instagram, TikTok, and YouTube by simply pasting the video URL and clicking ‘Upload’.
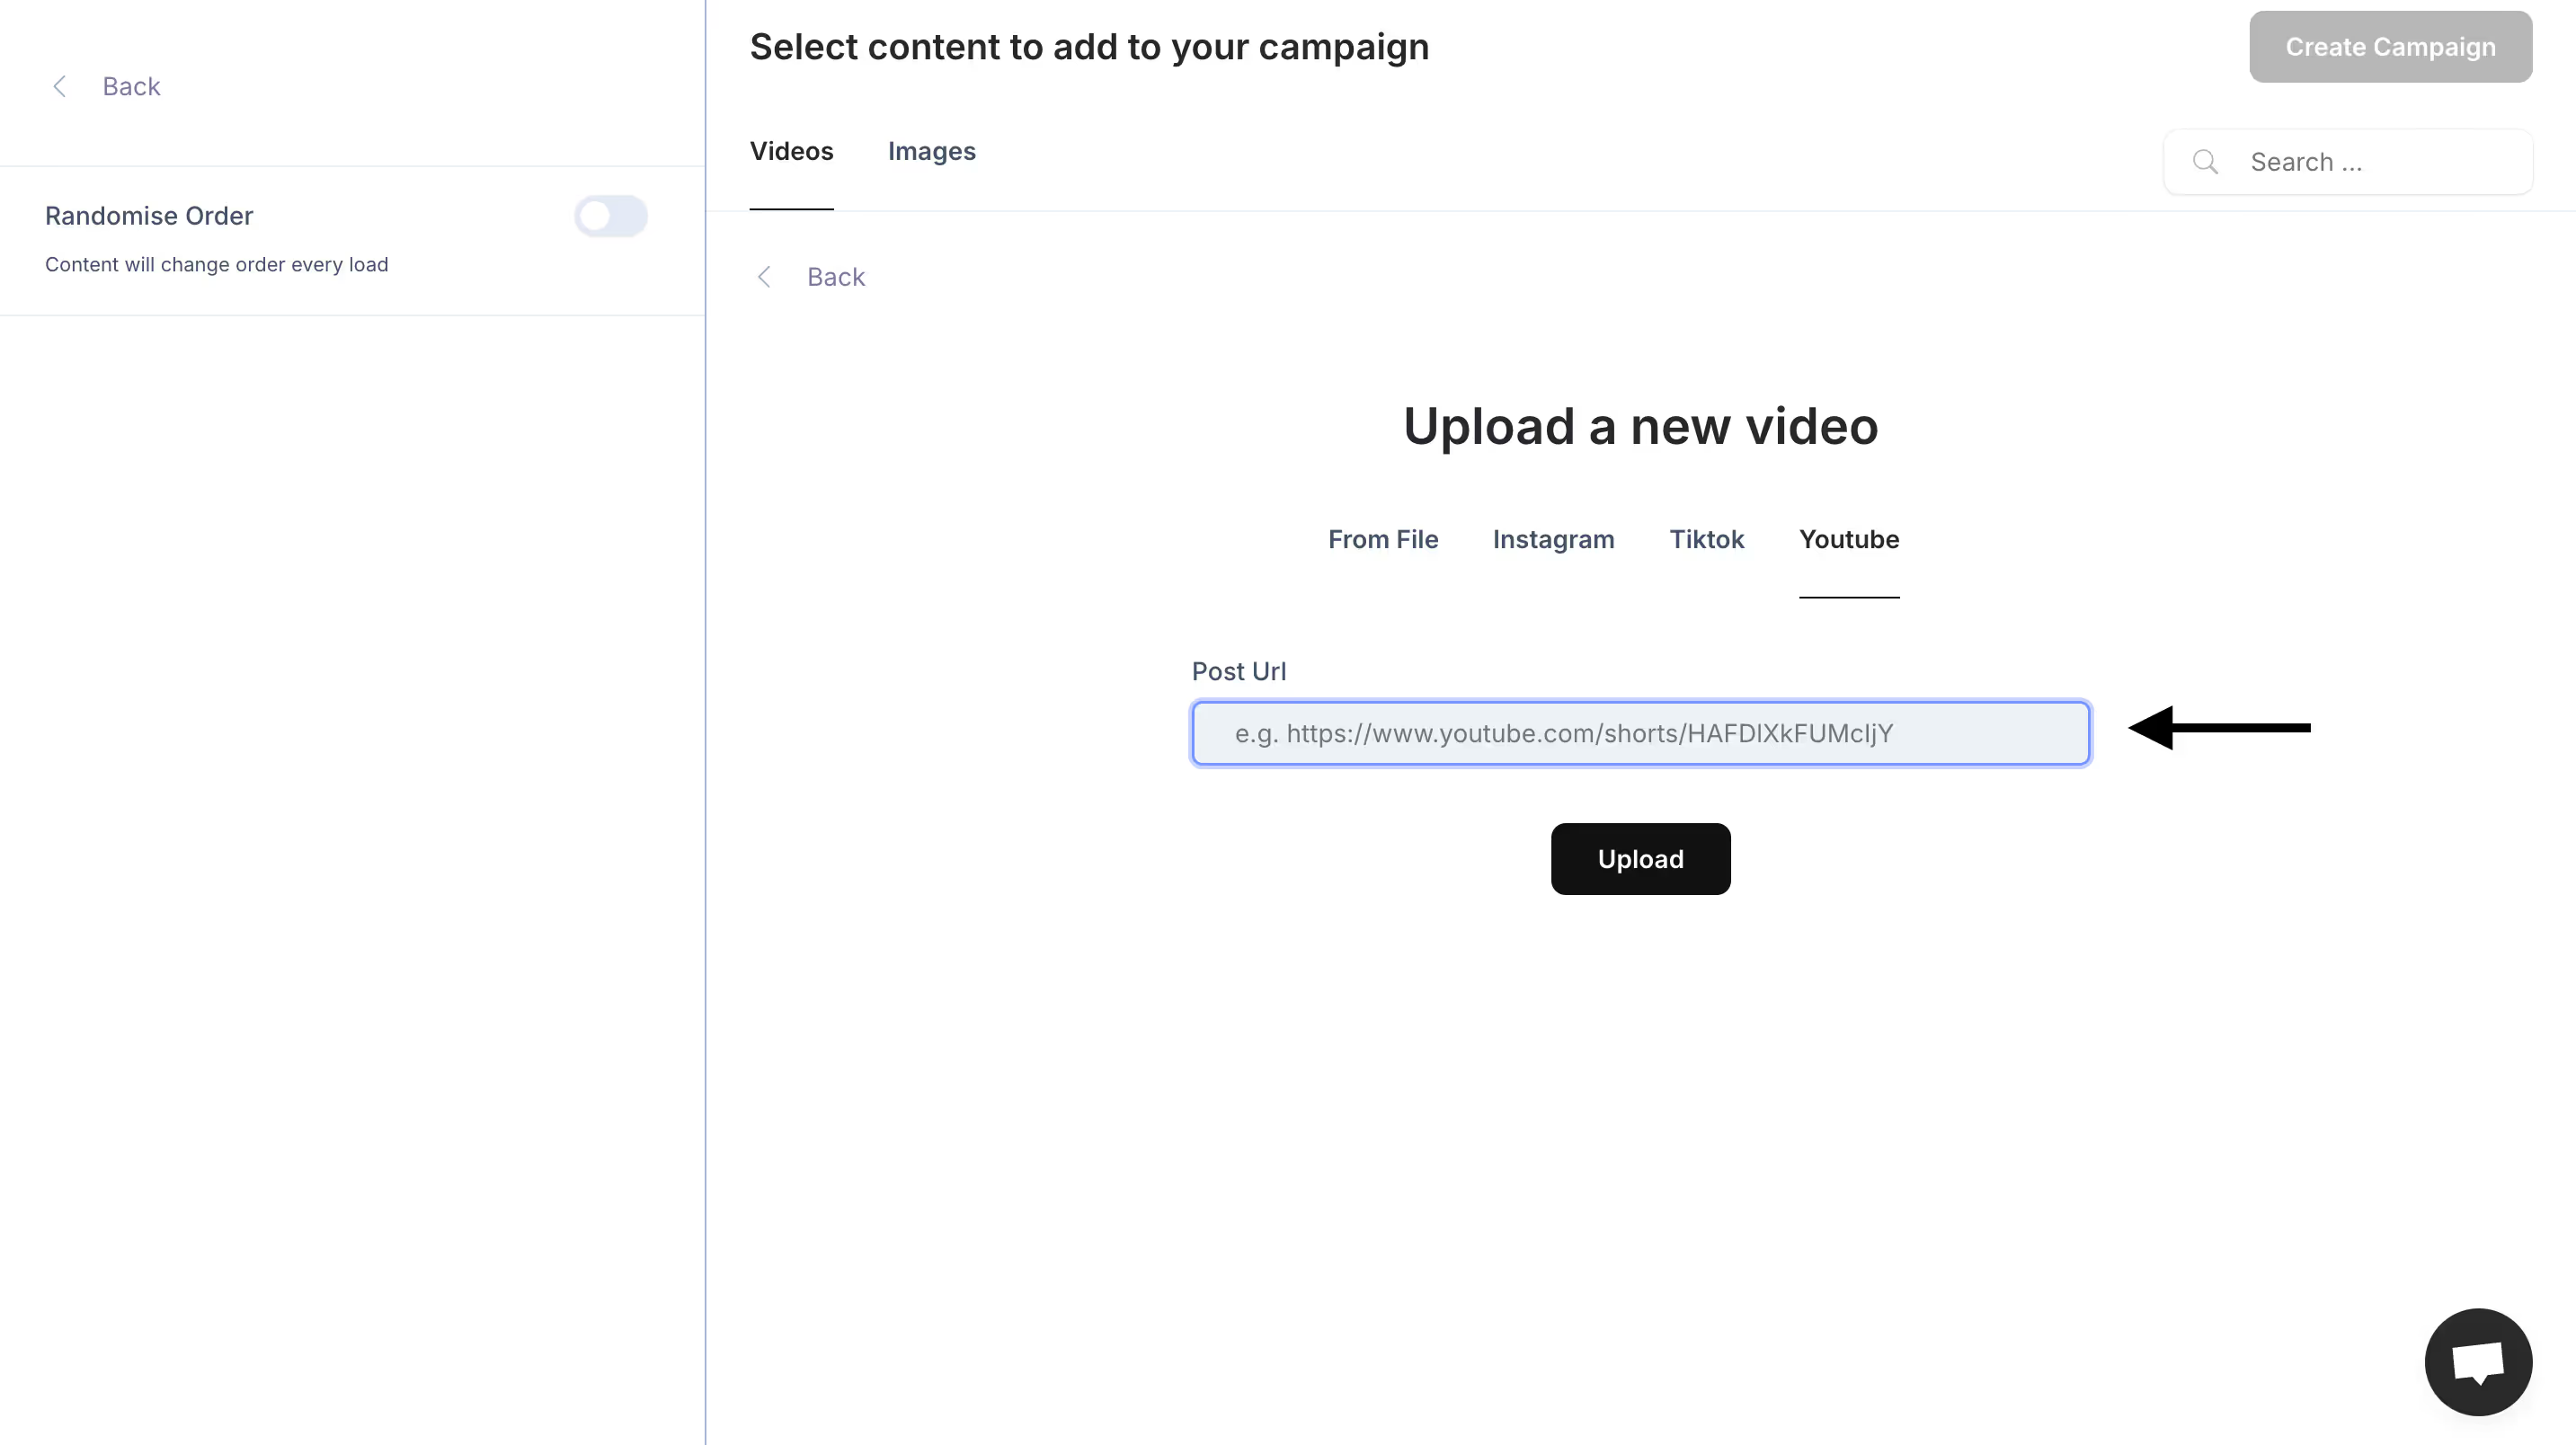
Once uploaded, you can rename the video as needed. Once done just click ‘Continue’.
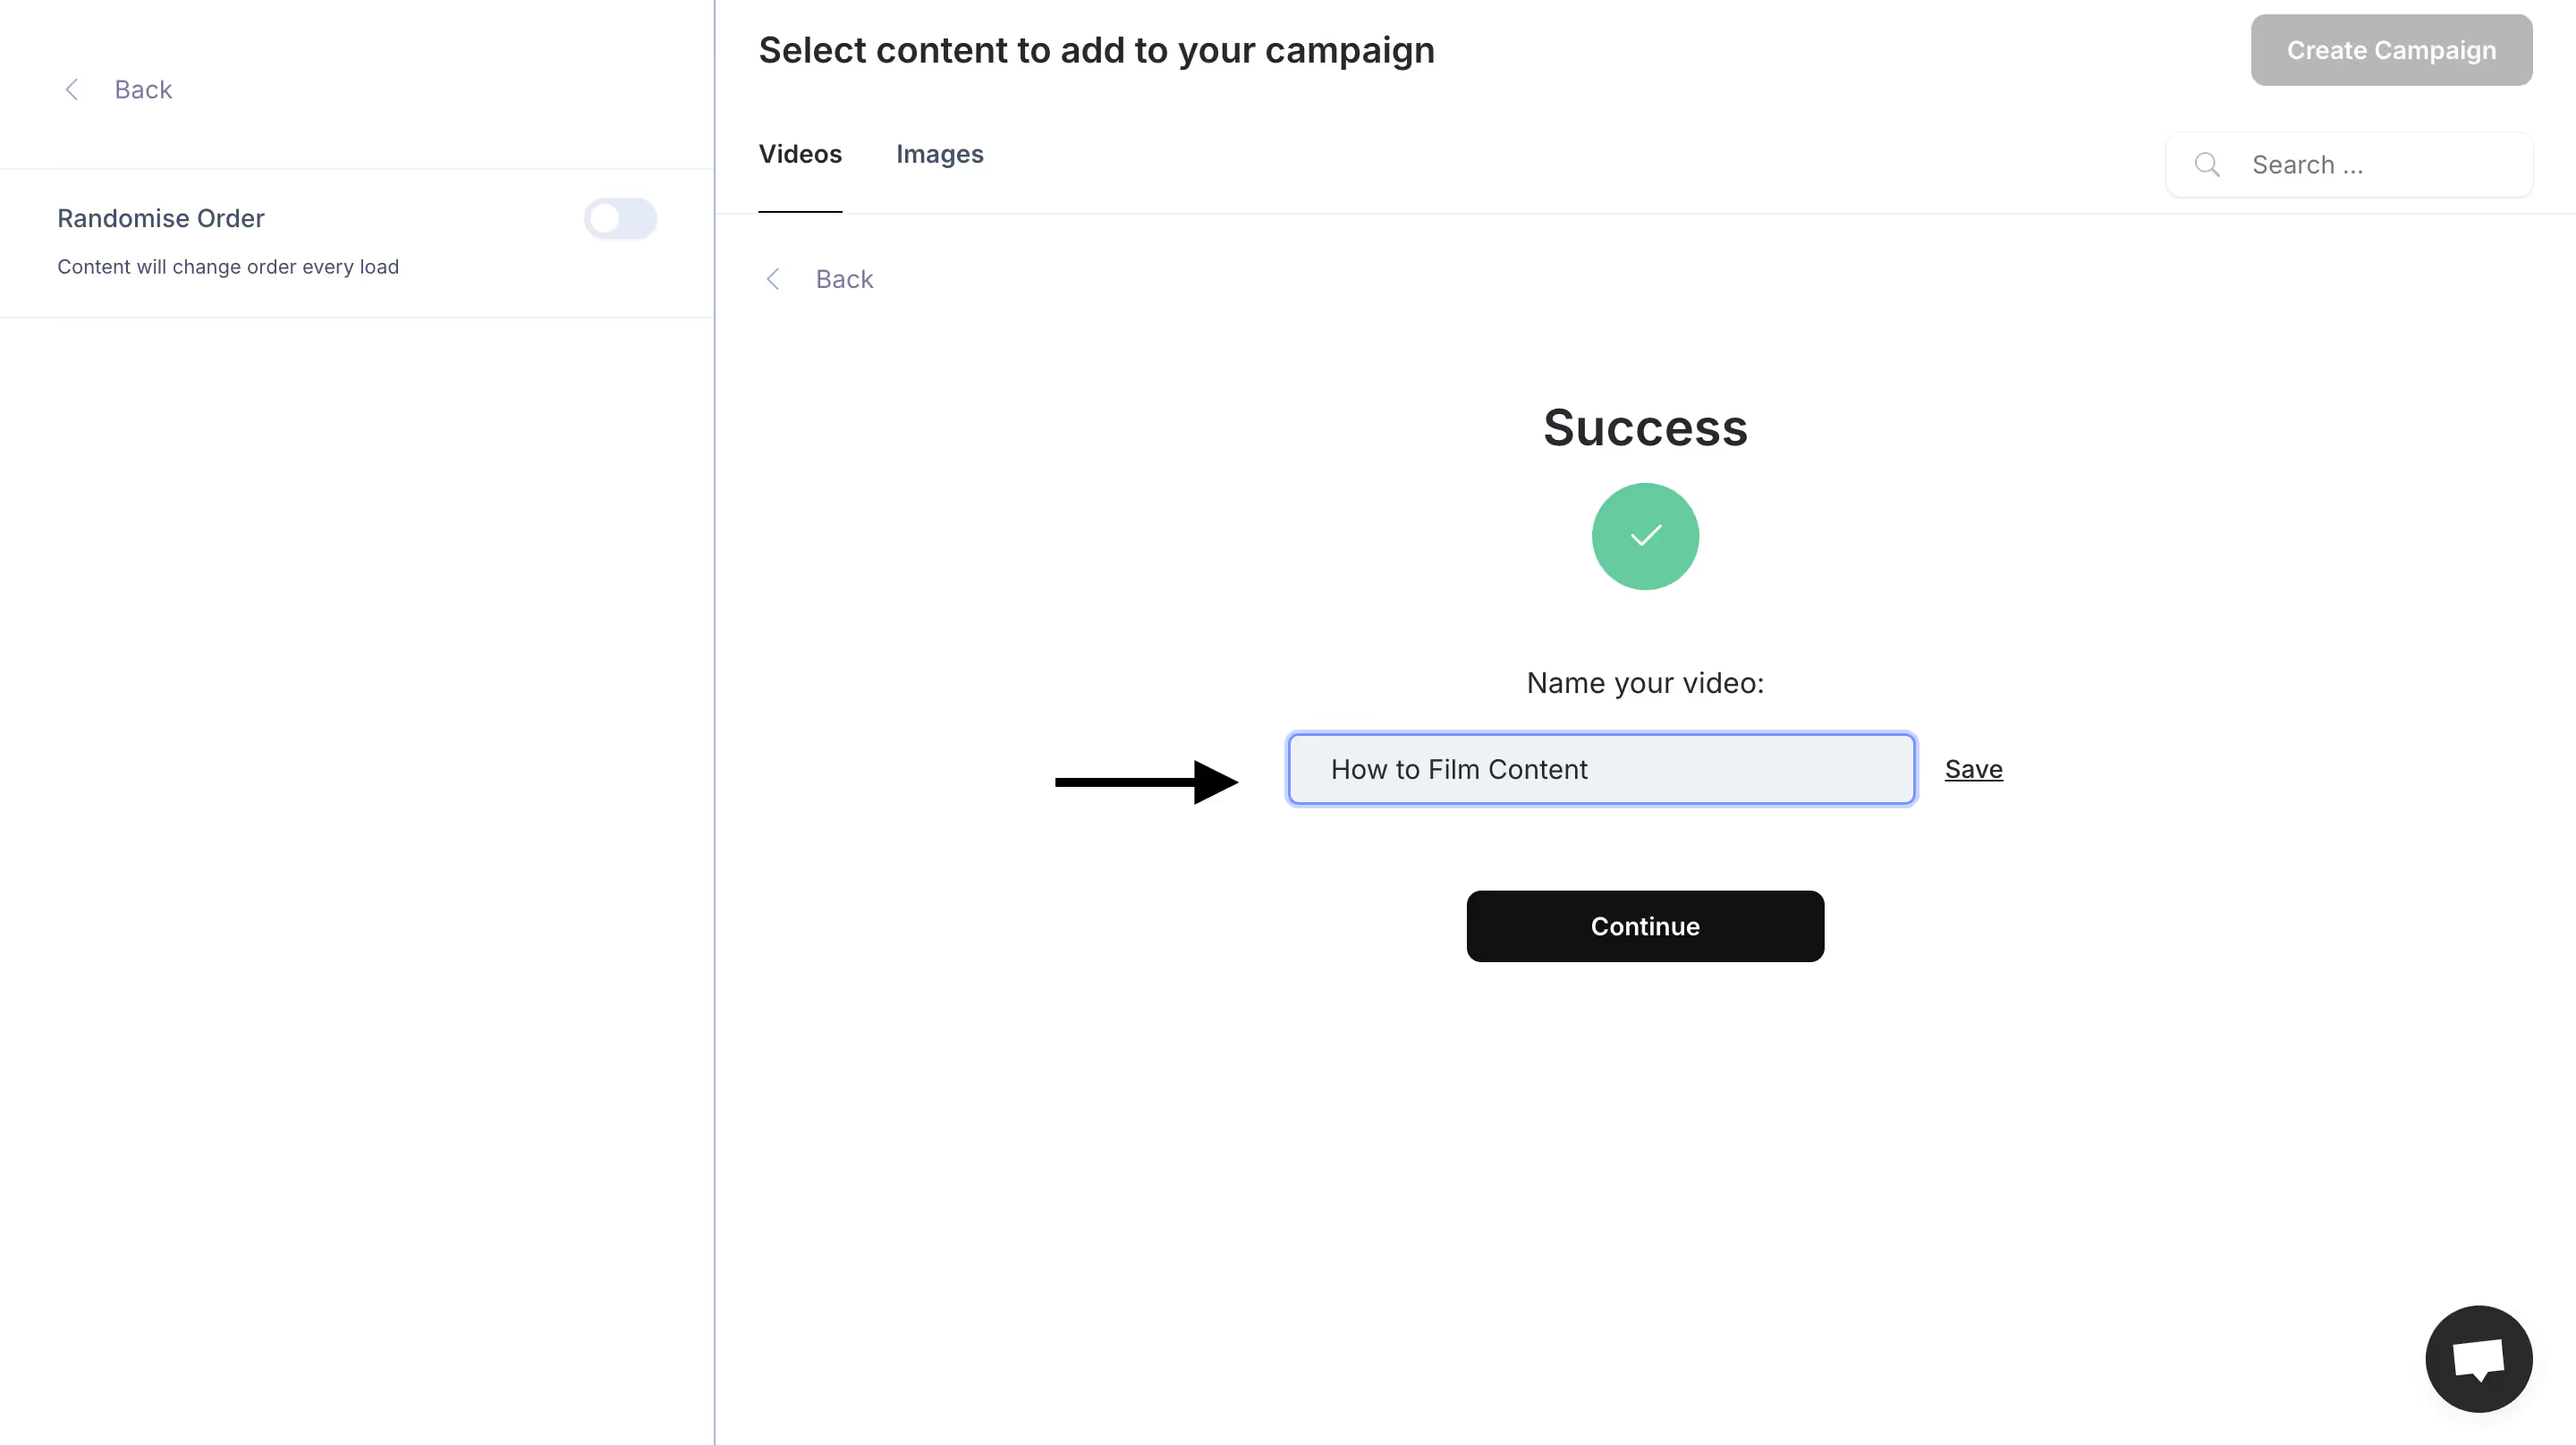
Select the video or all of the videos you would like to include in a carousel. On the left, drag them to reorder them if you want to. Once selected, click 'Create Campaign' in the top left.

4. Customise Your Campaign: Customise the experience to look exactly how you want using the design panel on the left hand side. You can add your brand colors, logos, and CTA buttons to prompt specific actions (like “’Shop Now’ or ‘Learn More’).
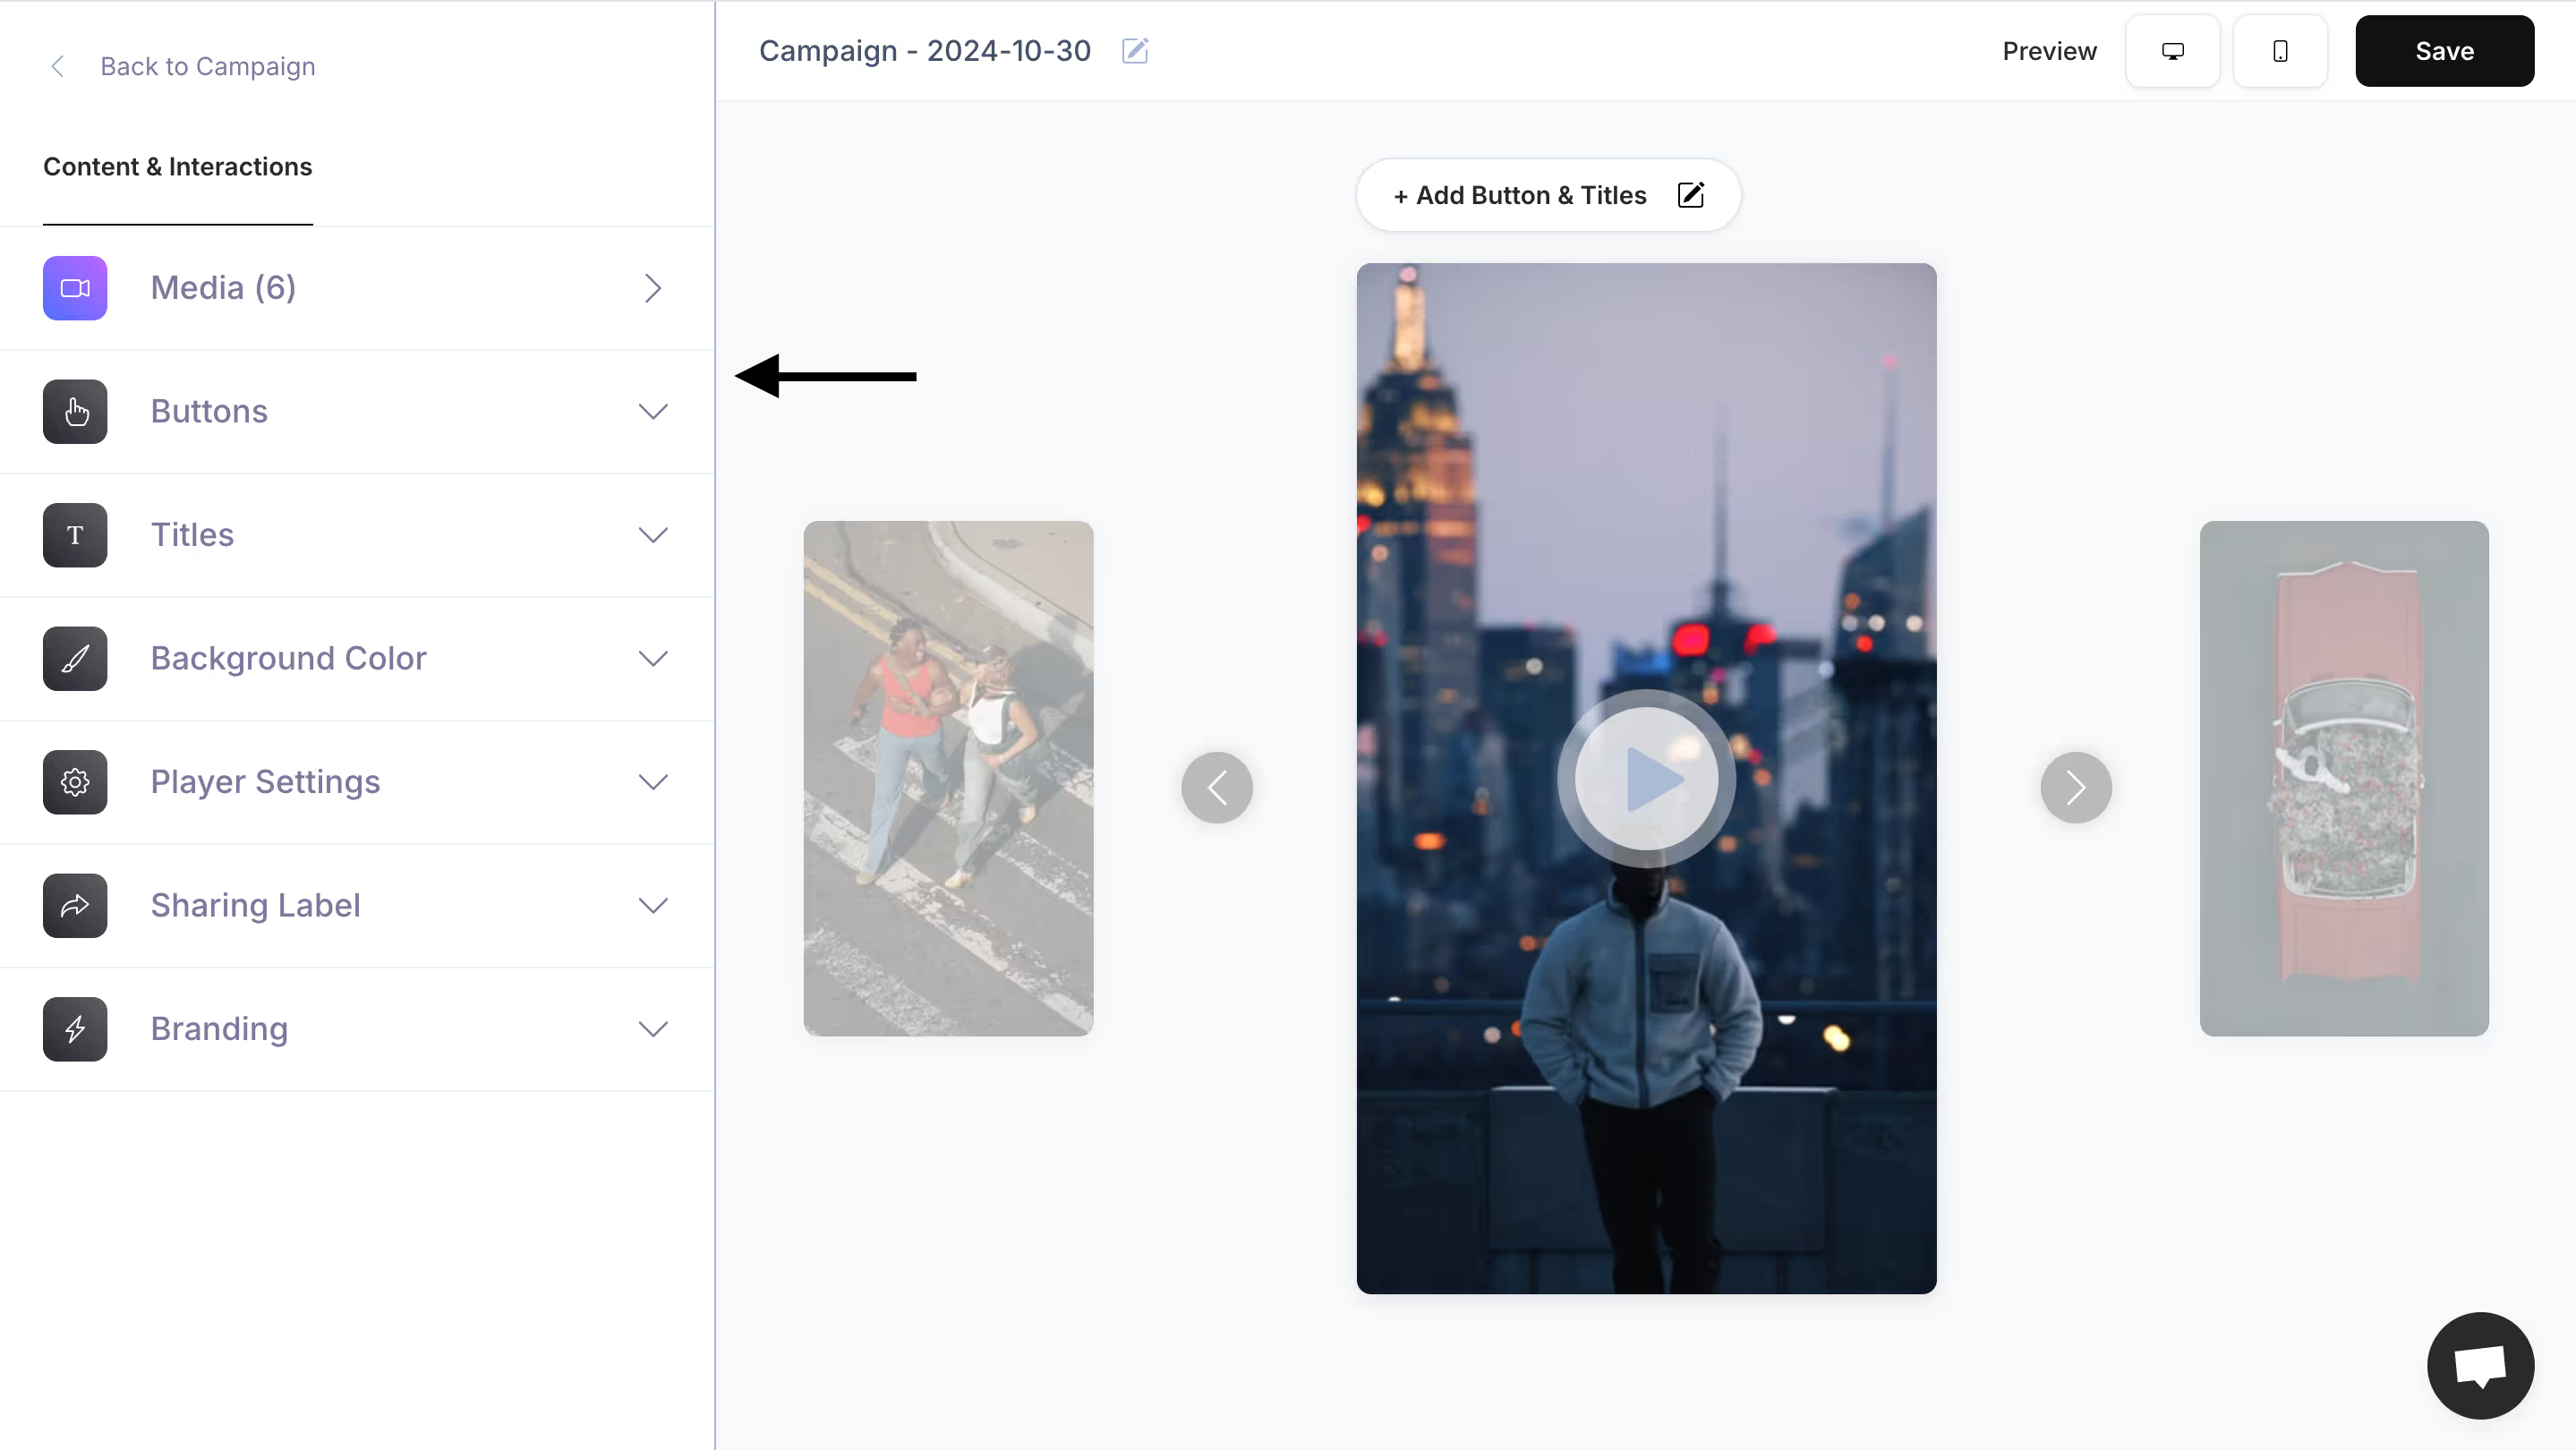
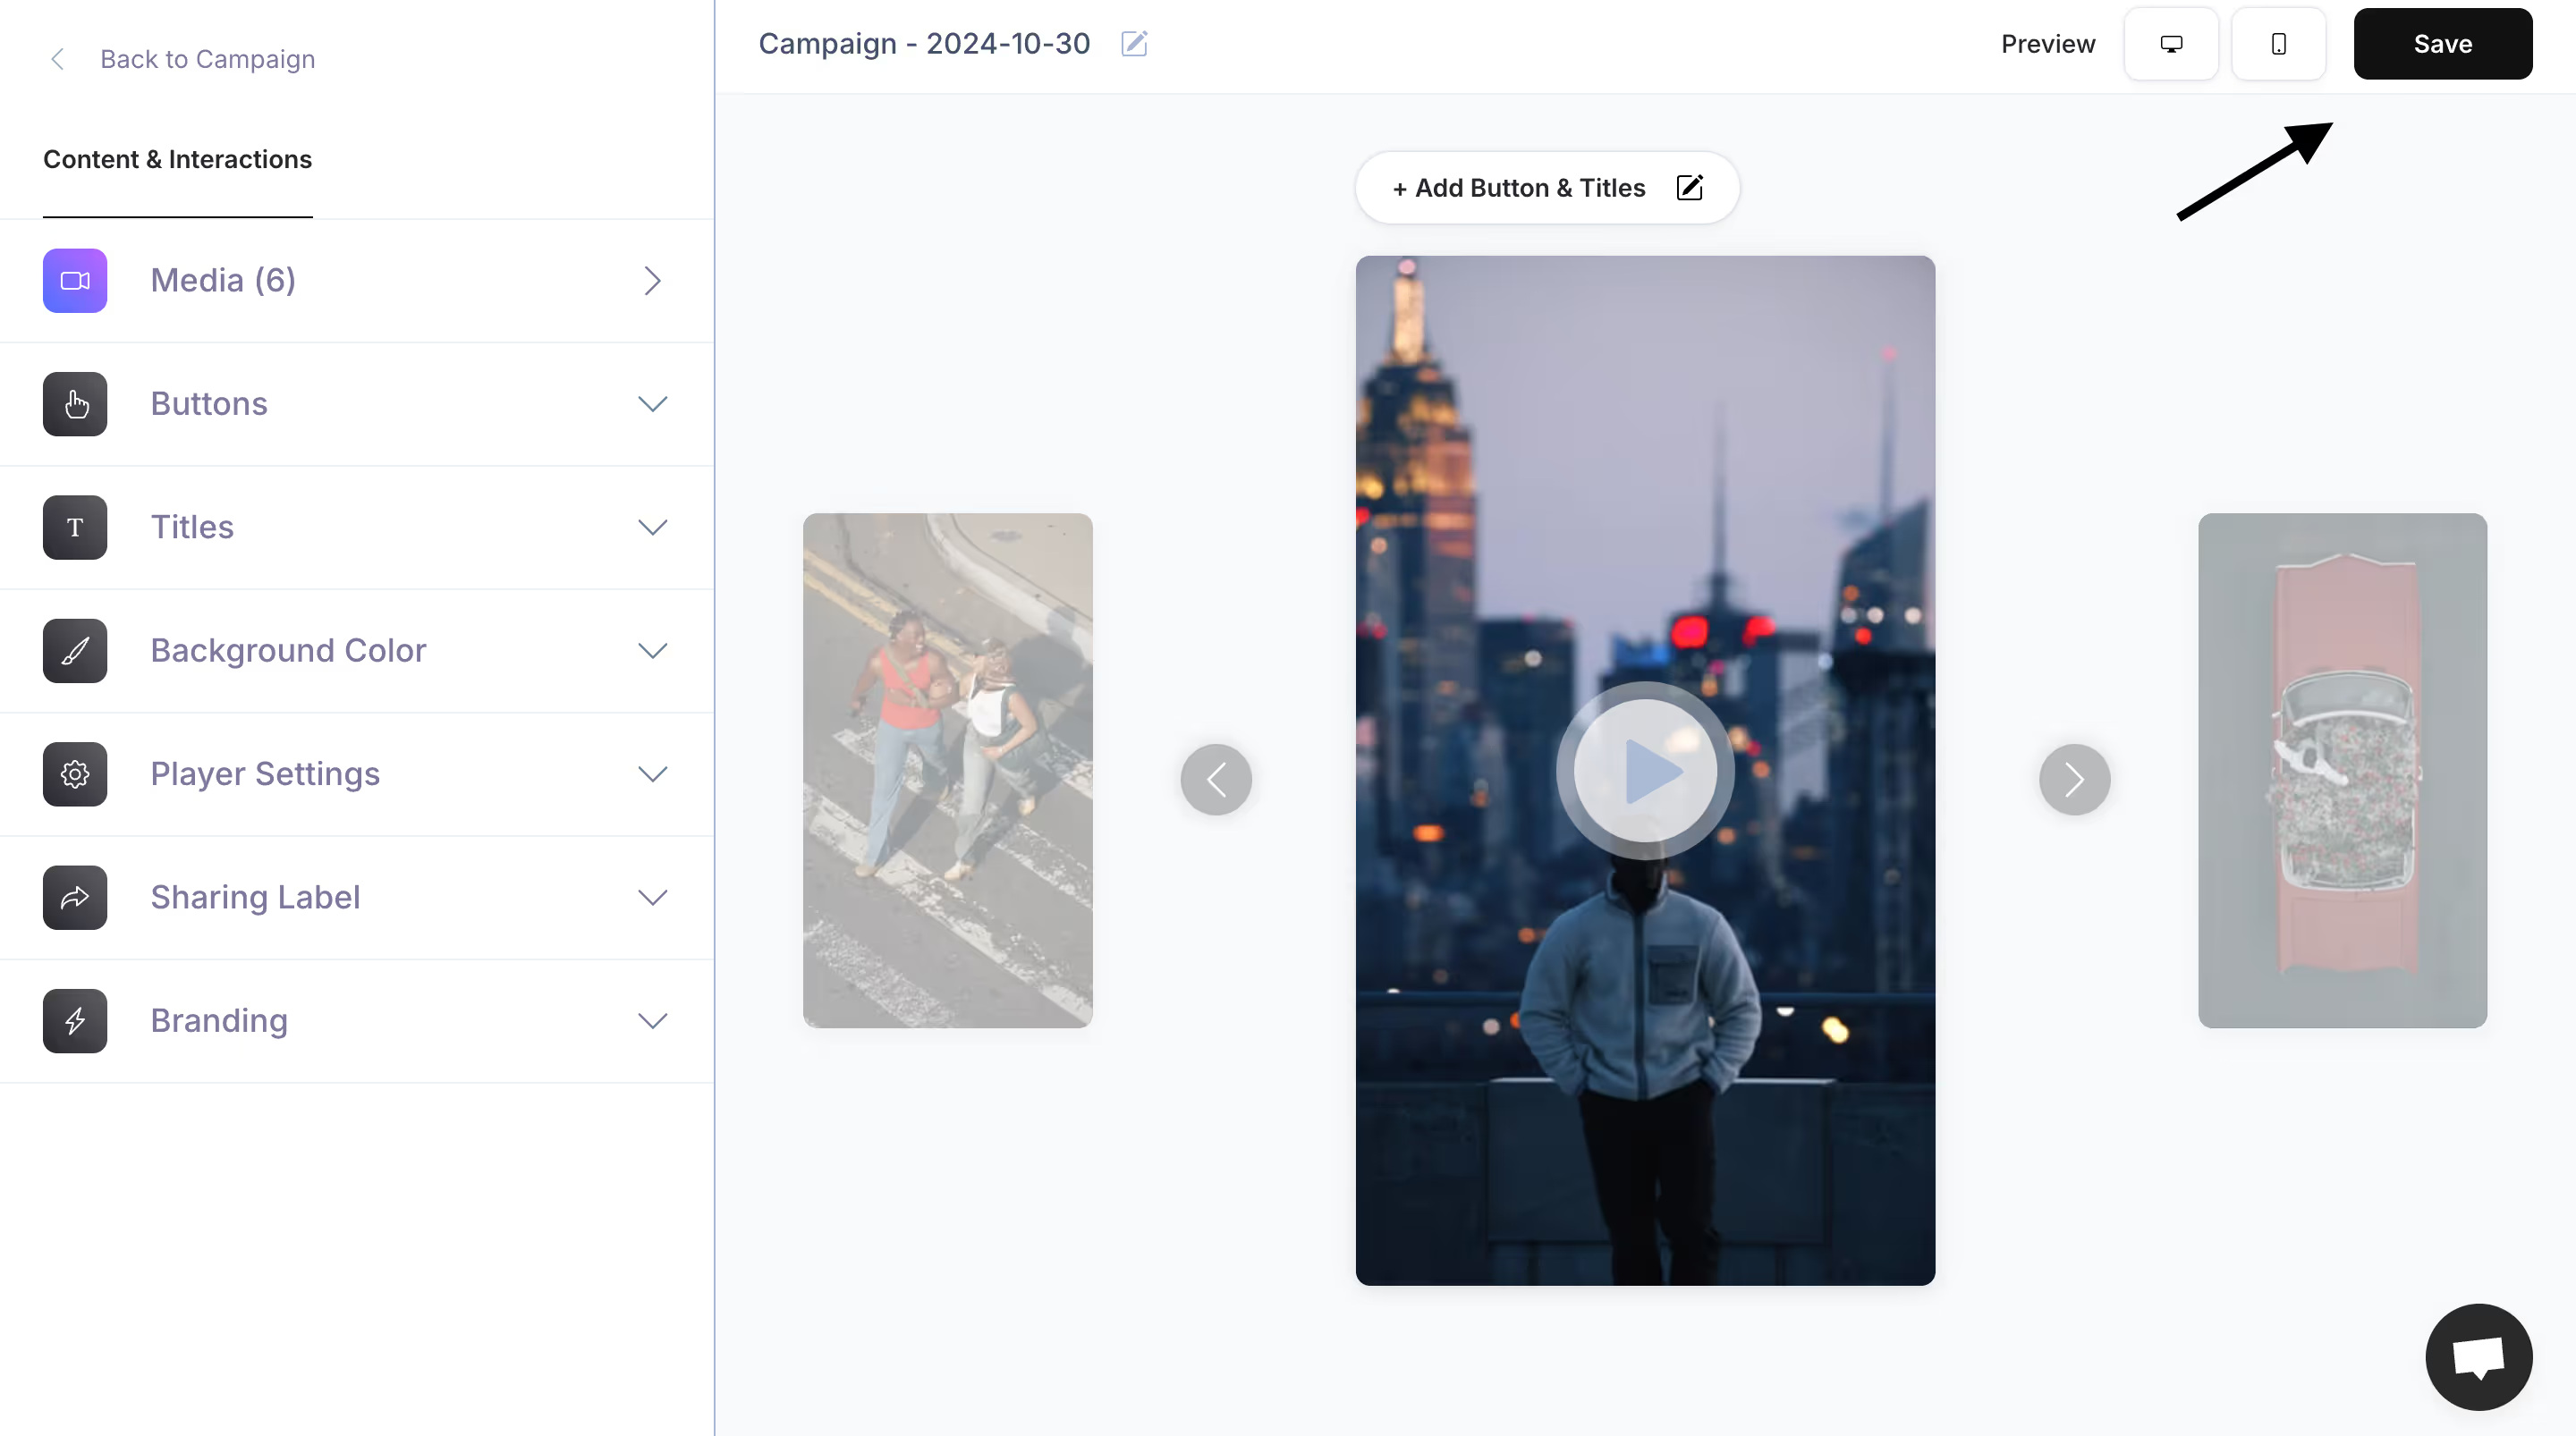
5. Preview and Save: Preview your work by clicking on the desktop or mobile icons in the top right. Once you're happy with all of your customisations, click ‘Save’.
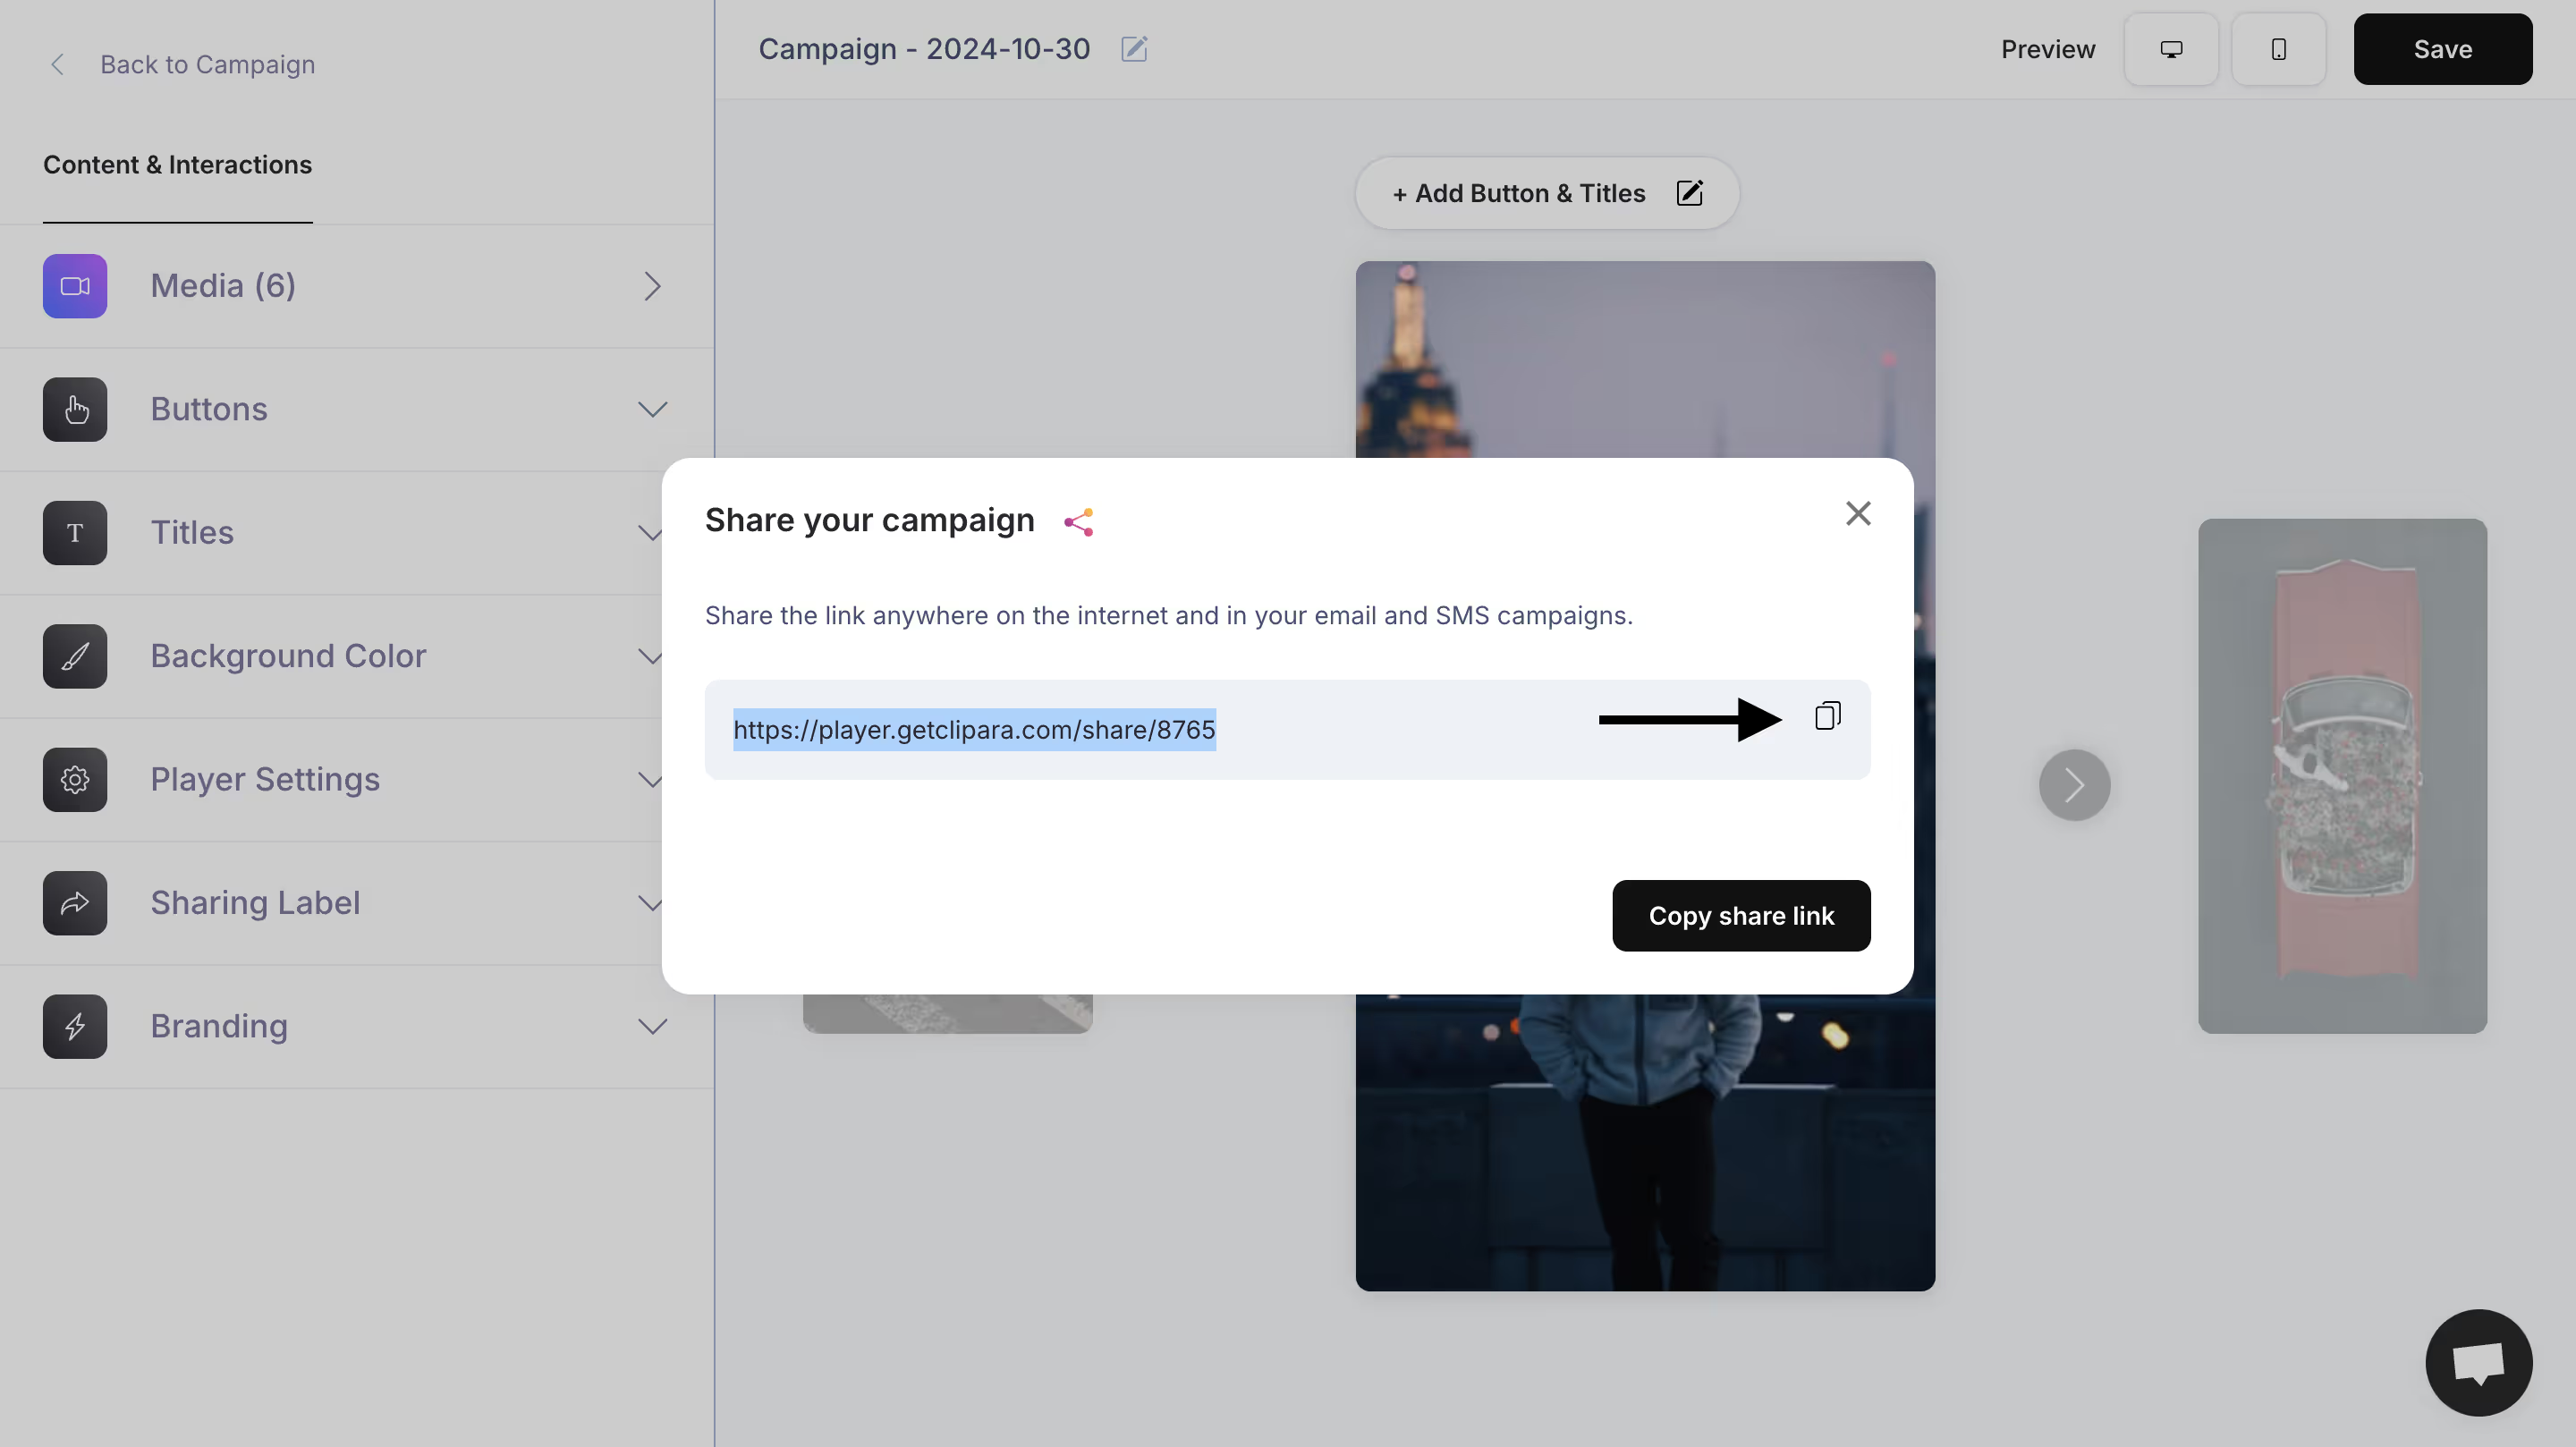
6. Get Your Link: Copy the Clipara-generated link for use in PowerPoint.
7. Create a Thumbnail: Design a thumbnail with a play button overlay using tools like Canva or Add Play Button to Image. Download your new thumbnail.

8. Insert Thumbnail into PowerPoint: Go to Insert > Pictures > Picture from File.
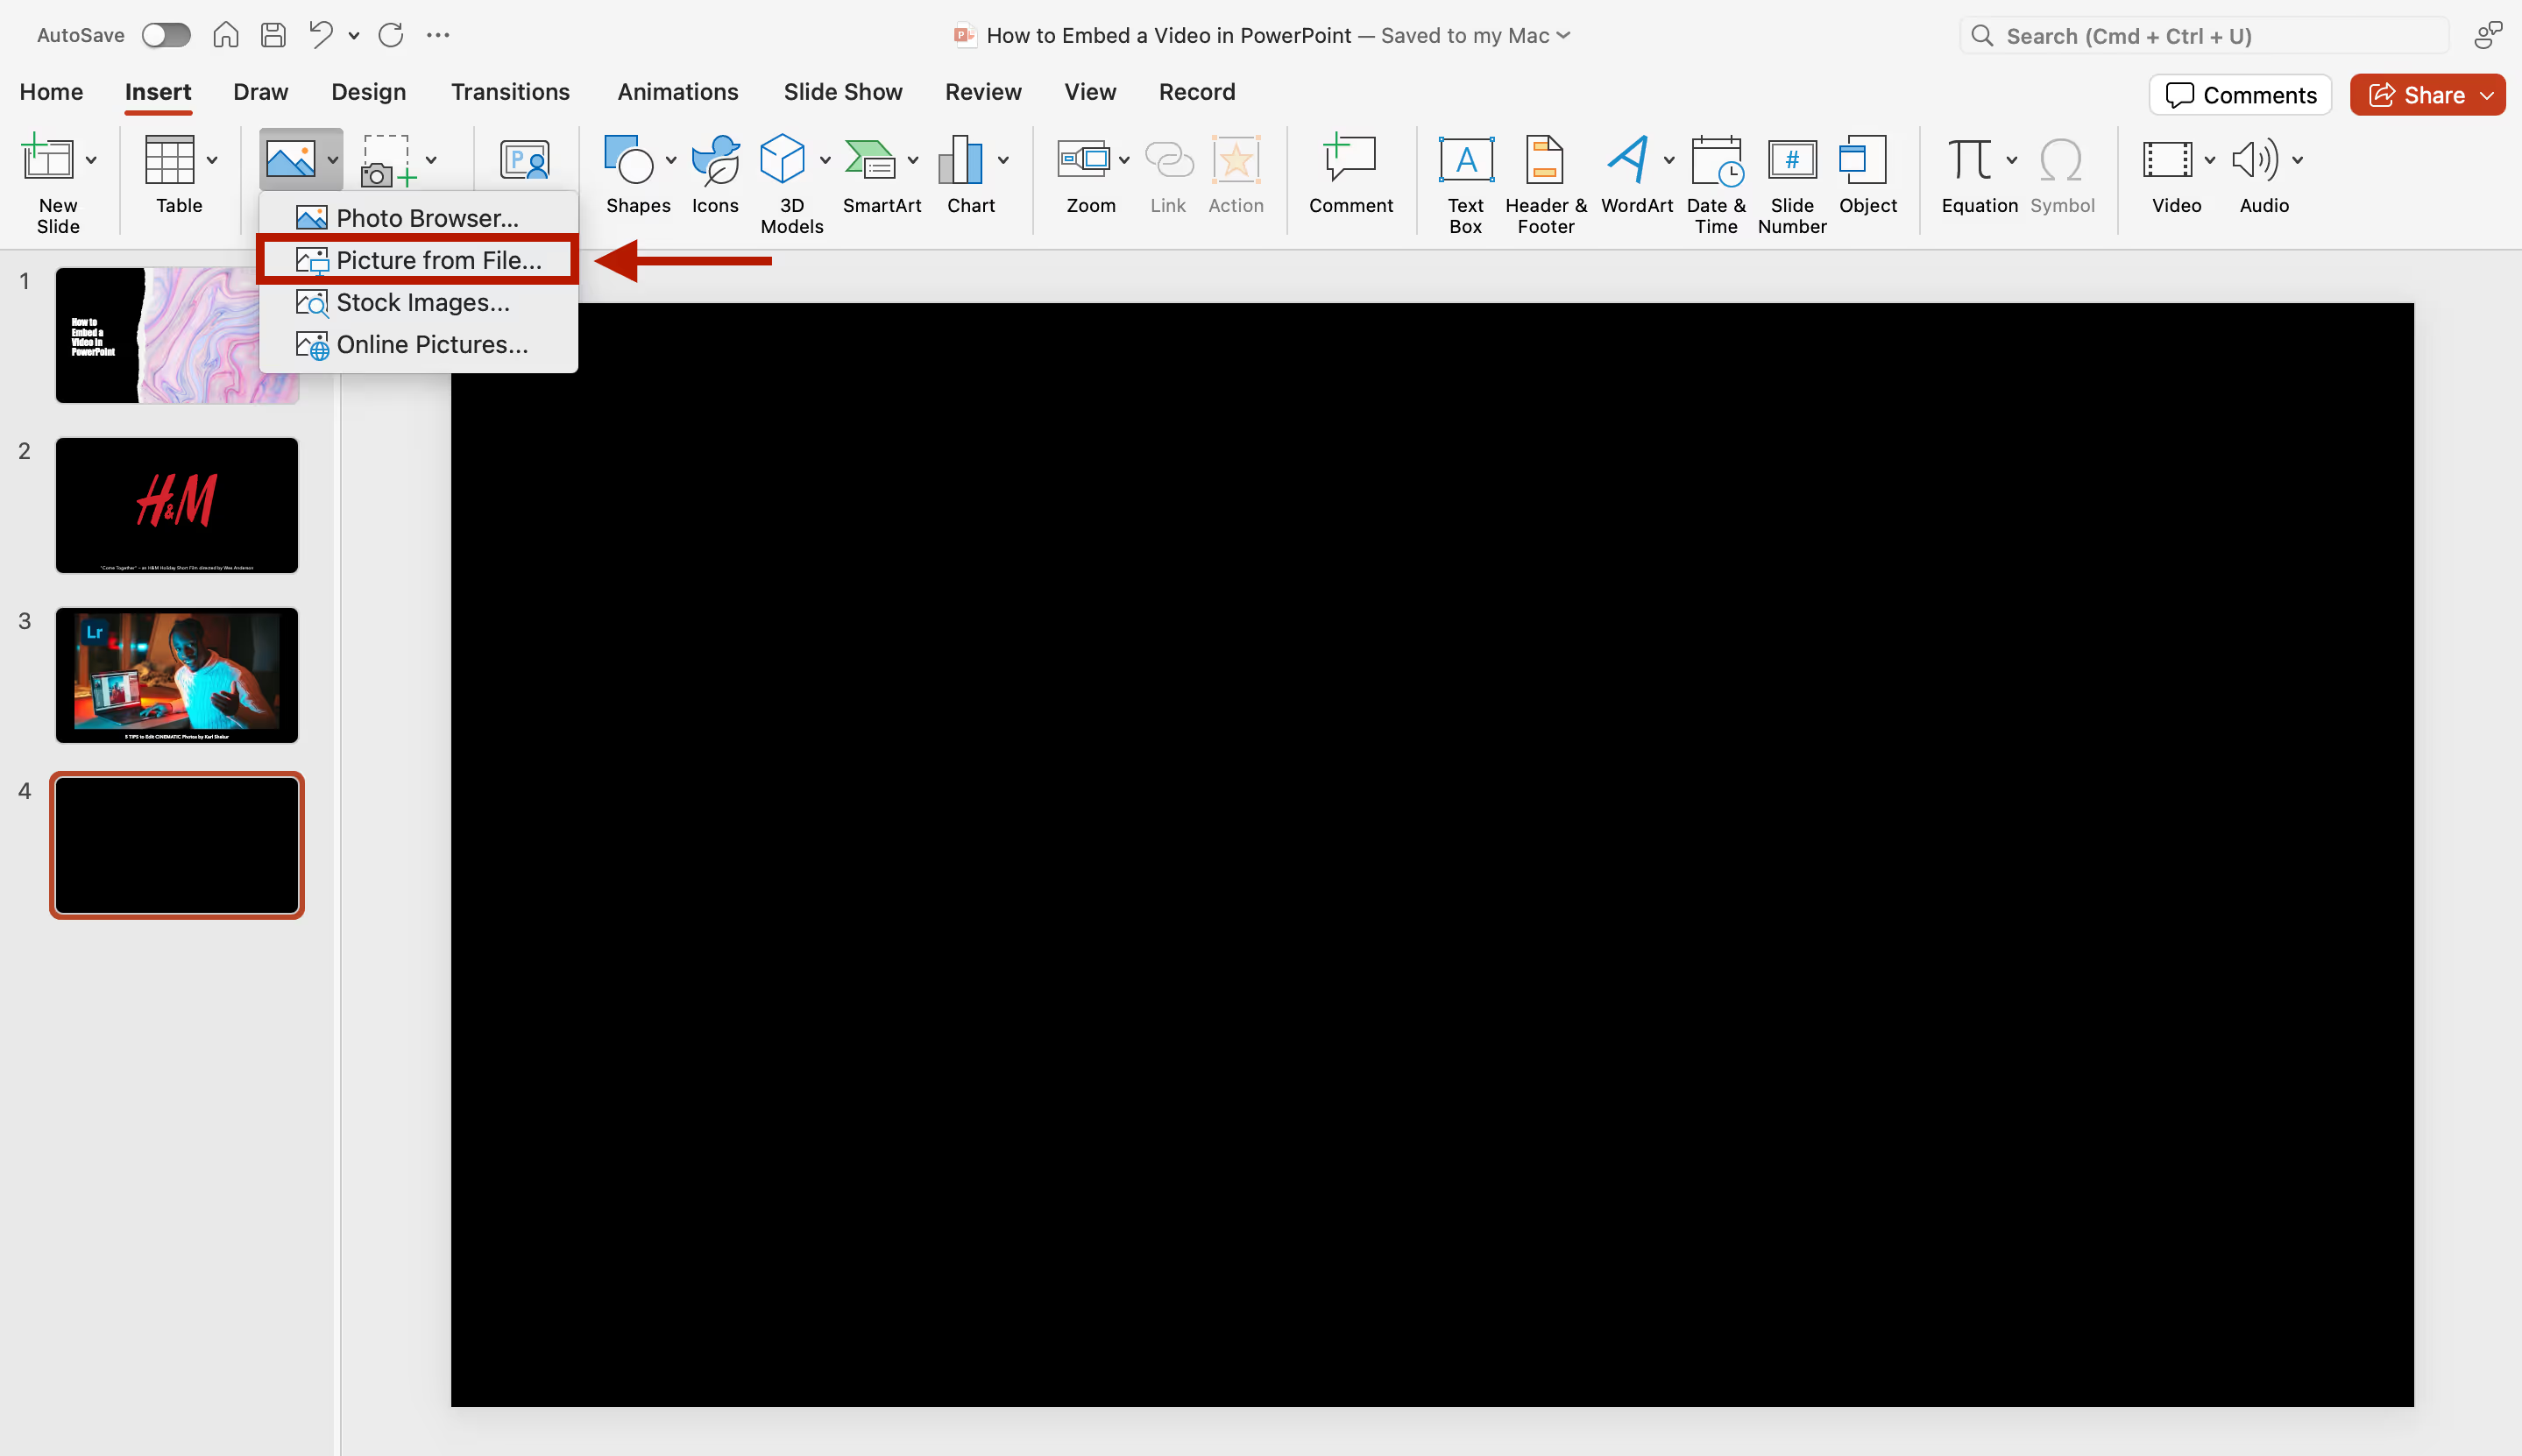
Next, right click the image and select ‘Hyperlink,’ then paste the Clipara-generated link and that’s it!
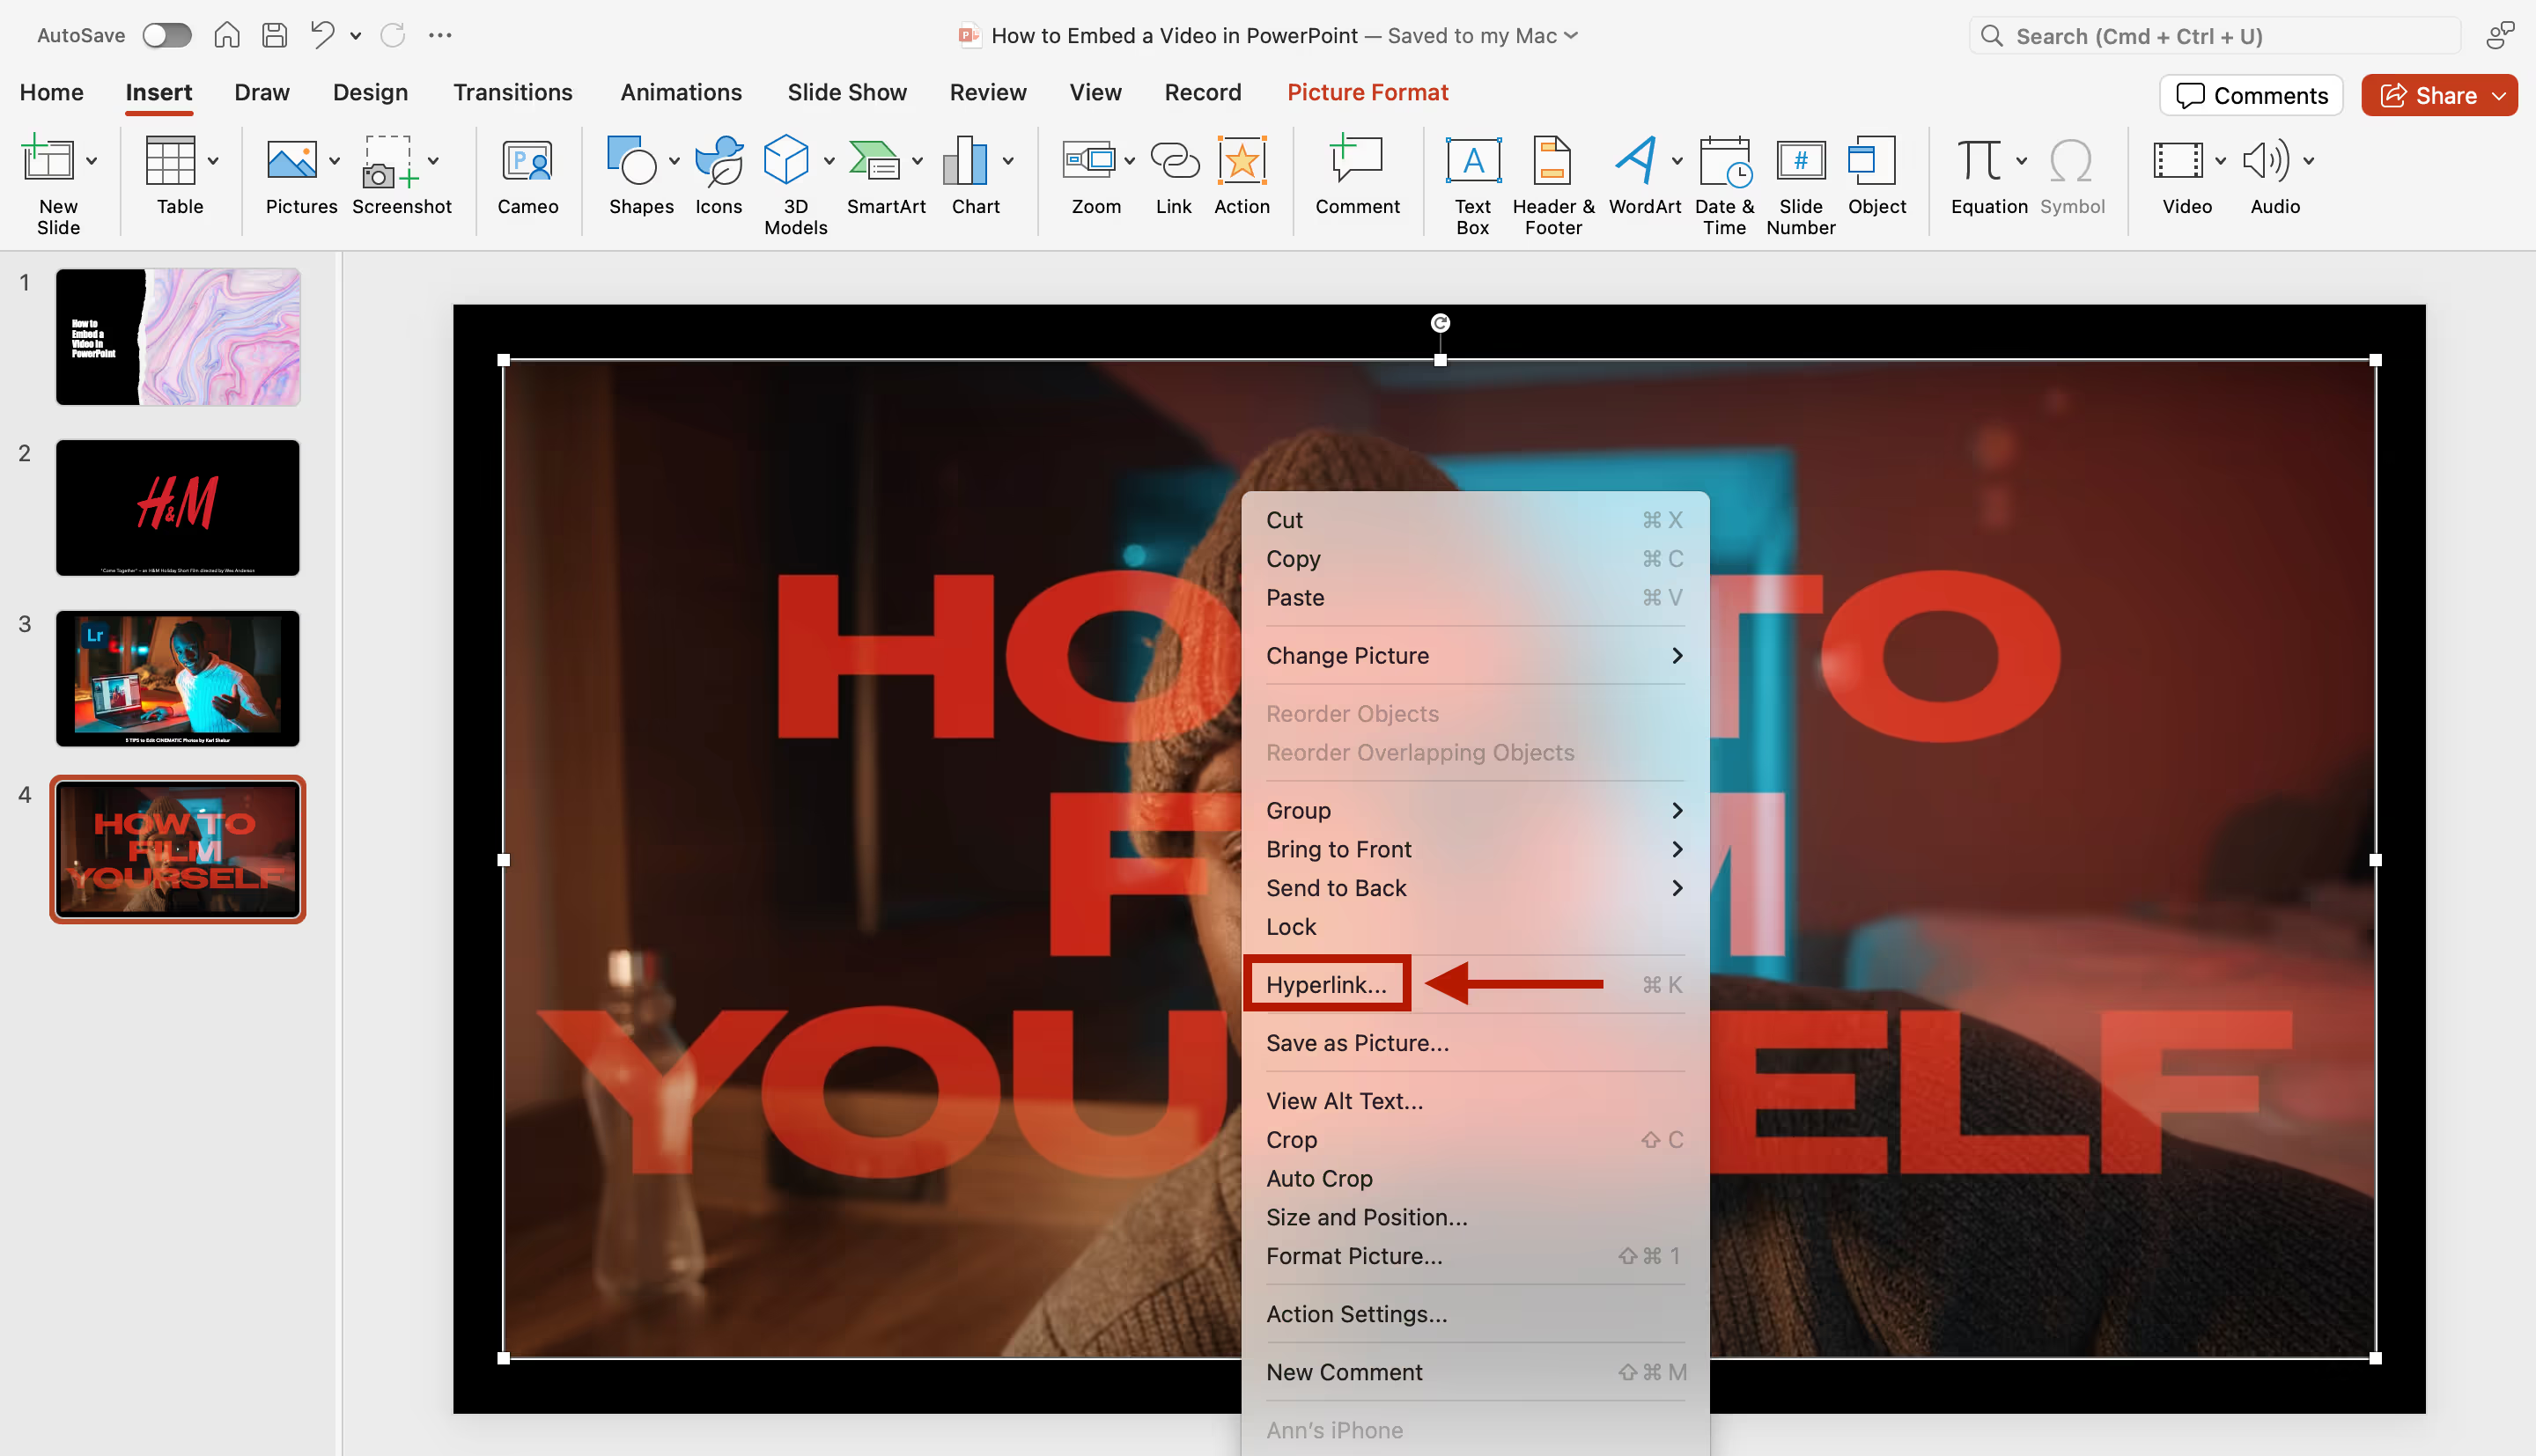
Now, when you click on your image while presenting, you’ll be redirected directly to your Clipara video page for a branded, distraction-free viewing experience, just like this:

You can even use multiple videos in a carousel, like this one:

Tips:
- Explore Clipara’s layout options: Test Clipara’s video grids and carousels to keep your presentation engaging.
- Add CTAs: Use built-in CTA buttons like “Shop Now” for actionable slides.
- Customize Branding: Add your colors and logos to keep videos consistent with your brand.
- Mix Video Types: Embed different types of videos (testimonials, tutorials) to add variety and depth to your slides.
Pros
- Branded, No Ads: Clipara’s fuly customisable layouts focus on your content, distraction-free.
- Engaging Interactivity: Shoppable features encourage audience interaction.
- Cross-Device Compatibility: Videos play seamlessly across mobile and desktop devices.
Cons:
- Setup required: Requires a Clipara account to get started.
Conclusion
Whether you’re adding video tutorials directly from your device or using a flexible platform like Clipara, embedding videos in PowerPoint is a powerful way to make your presentations more engaging. Each method has its strengths, so choose the one that best fits your presentation needs and setup. You can get started with Clipara for free here. Happy presenting!


-min.avif)